Attributes
List definitions of product attributes, filter by data type and search behavior, create new attributes or delete them.
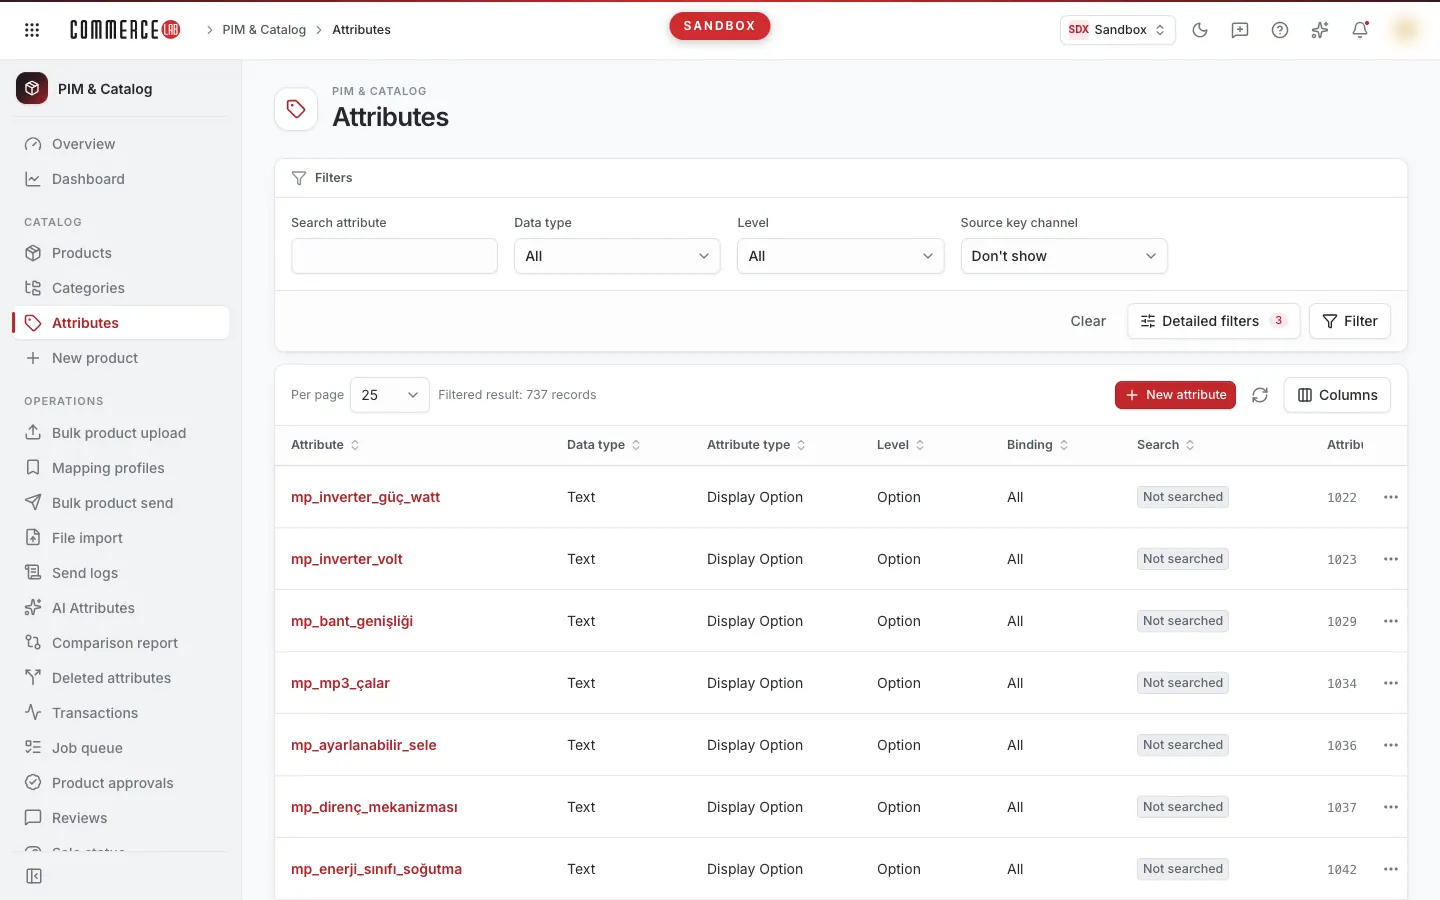
The Attributes screen is where the definitions of features you use to describe products (such as color, size, material, brand) are listed. From here, you can filter all attributes in the setup by data type, attribute type, level, binding type, and search behavior; create a new attribute; open the detail of an attribute; or delete an unused attribute. It is intended for teams responsible for catalog structure and product data quality.
Accessing the screen
Follow the menu path PIM & Catalog › Catalog › Attributes. If you do not see it in the menu, your account does not have permission for this screen.
The New attribute button and the Delete item in the row menu only appear for accounts with permission to modify attributes. If you do not see them, you can only view the list and open detail pages.
Screen sections
- Header Attributes.
- Filter card: always visible Search attribute box, selectable filters that are open by default; below are Clear, Detailed filters, and Filter buttons.
- Top row of the list card: Per page selection (25, 50, or 100; default 25), "Filter result: N records" line, New attribute button, refresh icon, and Columns menu.
- Attribute list and pagination below.
Filtering and searching
Values you type or select in filter fields are applied when you press the Filter button or Enter; if you have changed but not yet applied a filter, the Filter button appears highlighted. Clear resets all filters and search text and immediately refreshes the list.
| Field | Purpose | Tip |
|---|---|---|
| Search attribute | Searches in attribute name, source key, or attribute ID. | Partial text match is sufficient for name and source key, case insensitive. Exact match required for ID. To search by source key, first select Source key channel. |
| Data type | Filters by the attribute's data type. | Enabled by default. |
| Attribute type | Filters by attribute type. | Opens from Detailed filters list. |
| Level | Filters by attribute level. | Enabled by default. |
| Binding | Filters by binding type. | Opens from Detailed filters list. |
| Searchable | Shows attributes that are searchable (Yes) or not (No). | Opens from Detailed filters list. Does not filter if All is selected. |
| Source key channel | Shows the source key from the selected channel under the attribute name in the list. | Enabled by default; default value is Hide, in which case the source key is not visible. Options are in the format "Channel name (channel code)". |
Options in Data type, Attribute type, Level, and Binding lists come from values present in the setup attributes and are loaded with the initial list response; the list may appear briefly empty when the page first loads. Selecting All in these lists disables filtering.
You select which filters are open from the Detailed filters list; your selection is saved in your browser and the same filters will be open on your next visit. Closing a filter also clears its entered value; changes are applied when you press Filter.
Filters are kept in the address bar. If you share the filtered list link, the recipient will see the same result; filters with values will open even if closed on their screen.
List
| Column | Meaning |
|---|---|
| Attribute | The attribute's name. Clicking the name opens the detail page. If Source key channel is selected, the source key(s) for that channel appear below the name, separated by commas if multiple. This column cannot be hidden. |
| Data type | The attribute's data type. Determines the input format (e.g., yes/no, date, number). |
| Attribute type | The attribute's type. |
| Level | The attribute's level. |
| Binding | The attribute's binding type. |
| Search | If the attribute is not searchable, a gray Not searched badge appears. If searchable, a green badge shows the search query type (e.g., should; if undefined, Searchable), with a line below showing "boost X · priority Y". |
| Attribute ID | The attribute's system ID. |
Cells without values show "—". If no records exist, "No records found" and "Try again by changing filters." are displayed.
- Sorting: You can sort ascending or descending by clicking any column header; sorting resets the list to the first page. Sorting on the Search column is first by searchability, then by search priority. For equal values, attribute ID order is preserved to avoid row shifting when changing pages.
- Column visibility: You can hide or show columns except Attribute from the Columns menu. Your selection is saved in your browser.
- Row menu: The three-dot button at the far right of a row opens a menu with Open detail and, if authorized, Delete.
Actions
Adding a new attribute
Use this to define a feature not yet represented in products.
- Press the New attribute button at the top of the list card. The New attribute page opens.
- In the Basics card, fill in the Attribute name field. A note below warns: "Source key is generated from the attribute name and cannot be changed later." Choose the name carefully.
- Optionally enter a Description and select a Tag from the list. The Live checkbox is checked by default.
- In the Classification card, select Data type, Attribute type, Level, and Binding; all four are mandatory. Slicer type is optional.
- If needed, fill in Valid from, Valid to, Duration, Duration unit, and Recursion in the Validity and validation card.
- In the Localized names card, add names in other languages using Add localization (see note below).
- Press Save.
| Field | Required | Explanation / rule |
|---|---|---|
| Attribute name | Yes | If empty, shows "Value cannot be empty." Source key is generated from this name. |
| Description | No | Free text. Text consisting only of spaces is not saved. |
| Tag | No | One of the tags defined in the setup. If none selected, shows Not set. |
| Live | No | Checked by default for new attributes. |
| Data type | Yes | If empty, shows "Required field." Determines how values are entered (e.g., number, date, yes/no). |
| Attribute type | Yes | If empty, shows "Required field." Config type does not appear in the list; a note below reminds that attributes of this type cannot be edited from the console. |
| Level | Yes | If empty, shows "Required field." |
| Binding | Yes | If empty, shows "Required field." |
| Slicer type | No | Selected from list. |
| Valid from / Valid to | No | Date and time (minute precision). |
| Duration / Duration unit | No | Validation duration: number and unit. |
| Recursion | No | Free text. |
If any required field is missing, the related fields are marked red and saving is prevented.
If saved successfully, a "Attribute saved." notification appears and the new attribute's detail page opens. Initial settings are automatically applied to the new attribute: Send with product, Show in product description, and Filterable are enabled; Comparable and Searchable are disabled; Value separator is ;; Search priority (1-10) is 1; Search query type is should; Search boost is 1. You can change these settings from the Settings tab on the detail page.
If the attribute cannot be saved, an error message and a red "Something went wrong" notification appear at the top of the form; the form remains open for correction and retry.
If the attribute is created but initial settings cannot be saved, a yellow "Attribute saved." notification appears with error details, and the detail page opens. The attribute exists; do not create another attribute with the same name. Check and save settings from the Settings tab on the detail page.
Cancel returns to the previous page without saving entered data. If required option lists fail to load, an error box and Retry button appear on the page.
Localized names: If no rows exist, "No localization." is shown. Add localization opens a new row by selecting the first unused language; change the language from the dropdown and enter the localized name; delete the row with the trash icon. If all languages are added, a "This language is already in the list." warning appears. When changing the language from the dropdown, avoid creating duplicate rows for the same language.
Deleting an attribute
Use this to remove an unused or incorrectly created attribute.
- Press the three-dot button at the end of the row and select Delete.
- Read the warning in the Delete attribute window: it states that the attribute named in quotes and all its dependent values will be deleted and the action cannot be undone.
- Press Delete. To cancel, press Cancel.
If deletion is successful, a "Attribute deleted." notification appears and the list refreshes. This cannot be undone. If the operation is rejected, a red "Something went wrong" notification appears with a message explaining the reason.
Opening detail
Click the attribute name or select Open detail from the row menu. On the detail page, you can see the definition, settings, values, and channel mappings; see the Attribute detail document for details.
Common situations
- Filter lists appear empty. Options load with the list response. If they do not fill after page load, refresh the list with the refresh icon or Filter.
- Searching by source key yields no results. Source key appears only when a Source key channel is selected. Select the channel first, then search.
- I changed a filter but the list did not update. Changes apply when you press the Filter button or Enter.
- New attribute is not saving. Check that Attribute name, Data type, Attribute type, Level, and Binding fields are filled; missing fields are marked red.
Configis not in the attribute type list. Attributes of this type cannot be created from the console. Contact your system administrator if you need such an attribute.- New attribute or Delete is not visible. Your account lacks permission to modify attributes; you can only view the list.