Creating and Editing Products
Opening a new product or editing an existing product: category, color and size variants, price, stock, images, record tracking, and archiving.
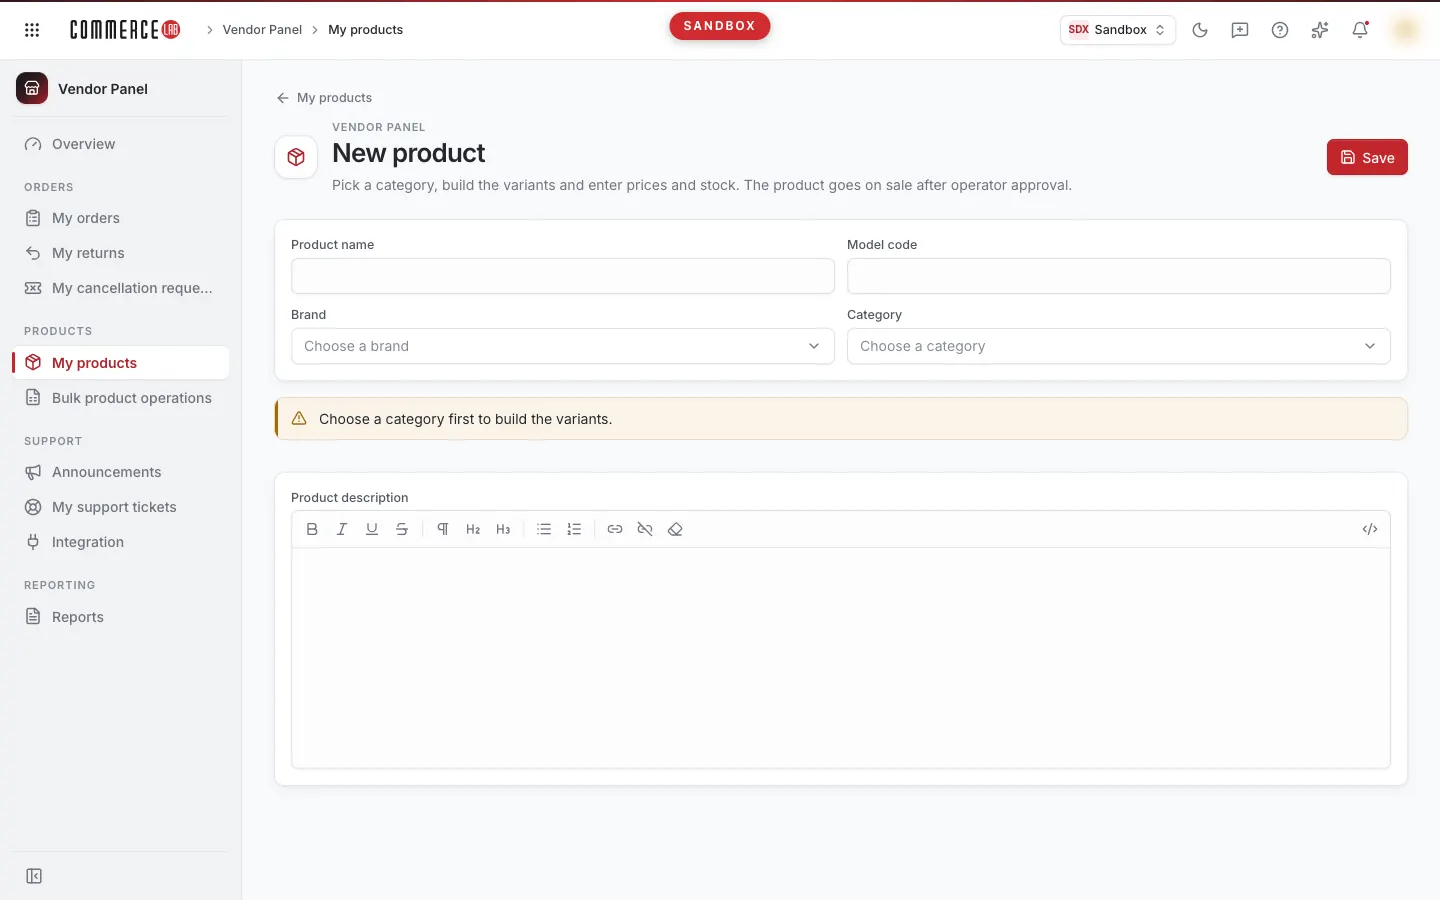
The product editing page is where you add new products to your catalog or update an existing product. A product is grouped under a single model: the model carries the product's name, brand, description, and category; each color (option) has its own images and option code; each color and size combination (variant) is sold with its own barcode, SKU, price, stock, and VAT rate. A newly created product goes on sale after operator approval.
Accessing the Screen
- Existing product: In Vendor Panel › Items › My products list, click a row or select Open detail from the row menu. Each row in the list is a variant; clicking any variant opens the page showing all colors and sizes of that model together.
- New product: Click the New product button at the top right of the My products list.
The new product page opens only for accounts with product editing permission. If you have permission to view products but not to edit, the existing product page opens but shows the warning You do not have permission to edit this product; details are read-only. at the top; Save, Archive, Apply to all, and Remove variant buttons are hidden. Some selection fields may appear enabled but without a save button, changes cannot be saved.
The My products button at the top left returns you to the list, which opens with the default view (no filters, All tab, newest products first).
The page does not warn about unsaved changes. Unsaved changes will be lost if you click the My products button or leave the page.
Screen Sections
From top to bottom, the page consists of:
- Header: For existing products, the product name and below it Model … · N variants; for new products, New product and the description Pick a category, create variants, enter price and stock. The product goes on sale after operator approval. On the right, Archive (existing products only) and Save buttons.
- Status badges (existing products only): approval, catalog process, and ERP approval badges.
- Warning strips: read-only warning and category warnings.
- Issue list: errors found when clicking Save are listed in a red-bordered card.
- Product details: Product name, Model code, Brand, Category.
- Variant axes: selection boxes for values like color and size depending on category.
- Sales and variants: bulk value row and a variant table for each color.
- Product description: a rich text field.
- Other attributes: single-value attributes of the category and other attributes saved on the product.
- Update history (existing products only).
If product details cannot be retrieved, a Something went wrong box appears instead of the page; try again with Retry.
Status Badges
| Badge | Meaning |
|---|---|
| Approved / Awaiting approval | Whether the operator has approved the product. |
| In catalog process / Not in catalogue process | Whether the product is in the catalog process. |
| ERP approved / Awaiting ERP approval | Whether the product is approved on the ERP side. |
Product Details
| Field | Required | Description / rule |
|---|---|---|
| Product name | Yes | The product's name, common to all colors and sizes. |
| Model code | Yes | The product's model code. Cannot be changed for saved products; the note The model code of a saved product cannot be changed appears below the field. |
| Brand | Yes | Click the field; type at least 2 letters in the Search brand box that opens and select from the list (Type at least 2 letters to search). Brands not in the list cannot be entered; if no match, No matching brand appears. |
| Category | Yes | The Pick a category button opens the category tree. You can find a category by typing in the search box, expand/collapse branches, and select a row. After selection, the button shows the full category path. |
The category determines the variant axes (color, size, etc.) and attributes; this is also noted in the category box description. Therefore, select the category first for new products.
- If you change the category for a new product, selected color and size values, variant rows, images, and attribute values are reset.
- If you change the category for a saved product, variants are preserved but axes are rebuilt according to the new category. A warning Category changed: variant axes rebuilt according to the new category. Saved variants remain in the list; check before saving. appears at the top.
If category attribute data cannot be retrieved, a warning Category attribute sets could not be retrieved; variant axes may appear incomplete. appears. In this case, try refreshing the page before saving.
Variant Axes
Before selecting a category, this section shows Choose a category first to build the variants. If the category has no axes, it shows This category has no variant axes; the product will be saved with a single variant. and a single variant row is created.
If axes exist, a box appears for each axis (e.g., color and size). Above the section is the description Select colors and sizes to sell; a row is created below for each combination.
- Narrow down values by typing in the Search box next to the axis name. Up to 200 values are listed at once; search if the desired value is not visible.
- Check the boxes for the values you want to sell. The box shows N values selected below.
- Selected values are arranged in the list order (e.g., sizes S, M, L), not by click order.
For option axes like color, you can add a value not in the list: if the value is missing, a Add "…" value button appears. Added values appear as removable tags below the box. For variant axes like size, only listed values can be selected.
Rows are not created unless at least one value is selected from each axis; in this case, Choose at least one value on every axis to create rows. is shown.
If you uncheck and recheck a value, previously entered barcodes and prices for those rows are retained. Only rows visible on screen are saved. If you uncheck a saved variant's value, that variant still appears in the table.
Sales and Variants
Each selected color appears as a separate card. The top row of the card shows:
- Image box: The storefront image for the color; if none, an empty box with an add icon. Clicking opens the image editing box.
- Color name and below it N images (or Images not loaded if images could not be retrieved).
- Option code field: the code for that color. If the color has a saved variant, this field cannot be changed.
The table below the card has a row for each size:
| Column | Description |
|---|---|
| Size (axis name) | The axis value of the row. |
| Barcode | The variant's barcode. Cannot be changed for saved variants. ERP code may appear below in small text. |
| SKU | The variant's stock code. Cannot be changed for saved variants. ERP code may appear below in small text. |
| List price | The price shown with strikethrough. |
| Sale price | The price the customer pays. |
| Stock | The variant's stock quantity. |
| VAT | —, %1, %10, or %20. If the saved product's rate differs, that rate is also listed. |
| Trash can | Remove variant: Visible only on new (unsaved) rows. Saved variants cannot be removed from this page. |
When you enter a barcode or SKU in a new row, or an option code for a new color and leave the field, the code is checked for usage. If in use, the field is highlighted in red. If checking is not possible, saving is not blocked.
Apply to all
The gray row above the table contains List price, Sale price, Stock, and VAT fields and the Apply to all button.
- Fill in the values you want to write to all variants.
- Click Apply to all.
As noted (Only the fields you fill in are written to every row.), fields left blank do not overwrite existing values. Values are written to all rows on screen, including saved variants. This only fills the form; you must click Save to commit.
Editing Images
- Click the image box on the color card. The Images — … box opens; below it says The first image is the storefront image. Changes apply when you save the product.
- Drop images into the Choose images or drop them here area. Multiple files can be selected. Accepted types are .jpg, .png, .webp, and .gif; each file up to 10 MB. Files upload sequentially; during upload, N images uploading… is shown and the box cannot be closed.
- The first image is the Storefront image; others show with sequence numbers. Use Move left and Move right arrows below images to reorder. Remove (trash can) deletes the image from the list.
- Click Apply to update the form. Cancel closes the box without changes.
Images apply when you Save the product; Apply only updates the form. Unsupported files show …: unsupported type or over 10 MB in the box; failed files are listed with error messages. If no images, No images yet is shown.
If saved images for the color could not be retrieved, a warning Saved images for this option could not be loaded. Added images will be appended to existing ones. appears.
A maximum of 30 images can be saved per color.
Product Description and Other Attributes
- Product description: The product's description text. The field accepts formatted text.
- Other attributes: Single-value attributes of the category that are not axes. Click the field to open a list for searching and selection; Select is shown when empty. Clear the value with Clear. Attributes ending with
*are required. - Saved attributes: Attributes saved on the product but not present in the selected category are shown to avoid deletion. Below them is Saved attribute (option level) or Saved attribute (variant level).
Saving
- Click the Save button at the top right.
- The page validates the form before saving. If errors exist, the page scrolls to the top and a card titled Fix N issues before saving lists the errors. Missing required product fields are highlighted in red with Required field below; option code fields for colors left blank are also highlighted.
- If no errors, usage of newly entered barcodes, SKUs, and option codes is checked.
- If no errors but warnings exist, a Save anyway? box opens. Read warnings; continue with Save anyway or return to the form with Cancel.
- When saving is submitted, the Save status box opens to monitor processing. If saving fails, a Something went wrong notification appears with an error message and form data remains.
While saving, the Save button shows Saving….
A product can have up to 100 colors (options) and 500 variants.
Validation Rules
Blocking errors:
| Message | Action |
|---|---|
| Product name is required, Model code is required, Brand is required, Category is required | Fill in the respective field. |
| … is required | Select a value for a required axis or attribute of the category. |
| At least one variant is required | Select values from axes to create at least one row. |
| Enter option code for … | Fill in the Option code field on the color card. |
| Option code for … used in multiple options | Assign a unique option code to each color. |
| Barcode or SKU used in multiple variants | Barcodes and SKUs must be unique per variant. |
| N variants missing barcode or SKU | Enter barcode and SKU for every row. |
| N variants have invalid price, stock, or VAT | Price and VAT cannot be negative; stock must be zero or a positive integer. |
| N variants have only one price entered; list and sale prices must be entered together | Fill in both prices or leave both empty in a row. |
| … in use … | The barcode, SKU, or option code you entered is used in another record. Enter a different code. |
You can use comma or dot as decimal separator.
Warnings requiring approval:
| Message | Meaning |
|---|---|
| … option has no image; operator may reject during approval. | That color has no images. Products without images can be saved but may be rejected during approval. |
| …: sale price is higher than list price. | Sale price is higher than the strikethrough list price. |
Save Status
Saving is queued and processed asynchronously. The Save status box polls the result every two seconds.
| Text in box | Meaning |
|---|---|
| Save is being processed in PIM queue (…)… | Save is queued or processing; the status in parentheses shows queue state. |
| Product saved | Save completed successfully. Use Back to list to return to the list. |
| Save did not complete | Save ended with an error; error message shown below. |
| Operation is taking longer than expected. You can close this; the result will appear in the list in a few minutes. | No result after about three minutes. Close the box and check later in the list. |
| Save accepted; PIM did not return a trackable operation number. | Save accepted but no operation number returned. Continue with Back to list. |
The box also shows Operation no: …; share this number when opening a support ticket. If the result is product-specific, the table shows Product ID, Status, and Description for failed products.
The Back to list button appears only when save succeeds or no operation number is returned. You can close the box anytime with Close; the form remains with data.
After saving a new product, if you close the box and remain on the form, it is still the new product form. Do not click Save again; to edit the product, return to the list with Back to list and open the product from there.
Archiving
You can archive a product you want to discontinue selling. The button appears only for saved products and accounts with editing permission; it is disabled while saving.
- Click the Archive button at the top right.
- The Archive this product? box shows The model's N saved variants will be archived. and An archived product is taken off sale and no longer appears in the list.
- Click Archive in the box or return with Cancel.
When done, a notification N variants archived appears and the list opens. Archiving applies to all saved variants of the model; it cannot be used to archive a single size. If the operation fails, a Something went wrong notification appears and you remain on the page.
Update History
At the bottom of the existing product page is the Update history table showing changes made to the product:
| Column | Meaning |
|---|---|
| Date | Time of change. |
| Changed field | Name of the changed information. |
| List | The list where the change was made. |
| New value | The new value entered. |
| Operation | Type of change. |
| Status | Processing status of the change. |
If no records exist, No recorded updates is shown. If history cannot be retrieved, a red error message appears instead of the table.
Common Situations
- Variant rows do not appear. Select a category first, then select at least one value from each axis (e.g., both color and size).
- Cannot change barcode or SKU. These fields are locked for saved variants. Similarly, option codes for colors with saved variants and model codes for saved products cannot be changed.
- Getting "in use" errors when saving. The code you entered is used in another record. Assign unique barcodes and SKUs per variant and unique option codes per color.
- Uploaded images do not appear on the product. After uploading images, click Apply in the image box, then Save on the page. Wait until the save result shows Product saved.
- Saving takes too long. The queue may be busy. You can close the Save status box; the result will appear in the list in a few minutes. If it takes too long, open a support ticket with the operation number.
- Accidentally added a new variant. Before saving, click the Remove variant icon at the end of the row or uncheck the axis value.