Categories
View category trees; add root and subcategories, reorder among siblings, delete, and import to an empty tree via Excel.
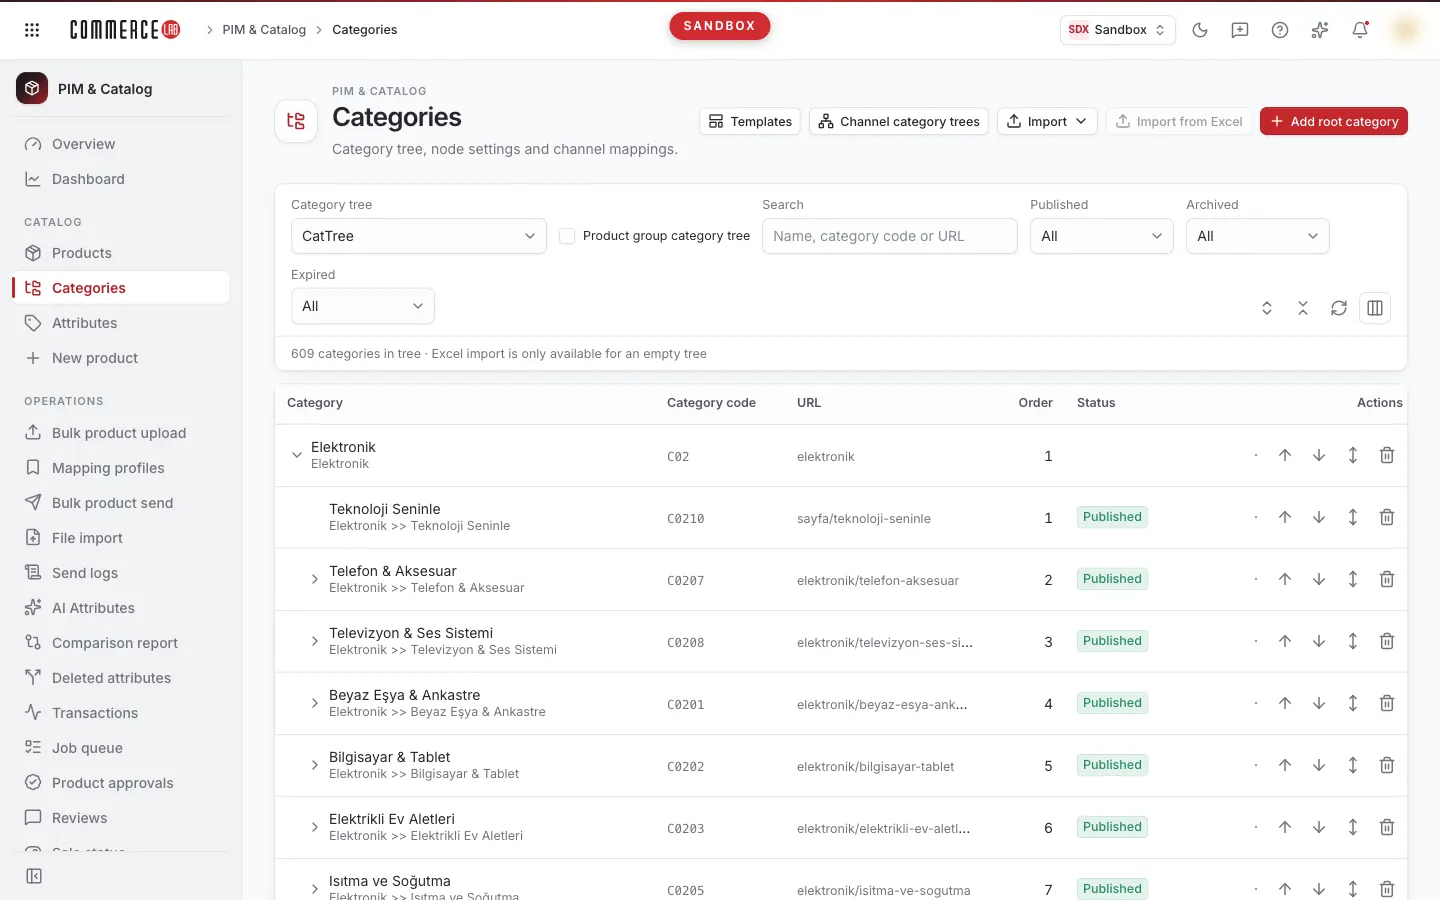
The Categories screen is where you manage the category trees in which products are grouped on the storefront and channels. You select a tree to see all its categories hierarchically, add new root or subcategories, reorder sibling categories, and delete categories. You can also bulk import categories into an empty tree from Excel. Catalog and e-commerce teams use this screen to build and organize the category structure; detailed settings, products, and ordering of a category are on its detail page.
Accessing the screen
Navigate via the menu: PIM & Catalog › Catalog › Categories. If you do not see it in the menu, your account lacks permission for this screen.
Accounts that can view but not write categories see the tree in read-only mode: add, reorder, delete, and import buttons are not visible.
Screen sections
- Header area: The Categories title and screen buttons on the right (Templates, Channel category trees, Import, Import from Excel, Add root category). If you lack write permission, only the first two buttons are visible.
- Filter bar: Category tree selection, Search box, three status filters, and tree tools on the right (expand all/collapse all, refresh, column selector).
- Counter line: Below the filter bar, shows the number of categories in the tree ("N categories in tree") or, when searching, the number of matching categories ("Matching search: N categories"). If you have write permission and the tree is not empty (or a status filter is selected), a note "Import from Excel only enabled on empty tree" appears next to it.
- Category tree: A table showing categories nested. There is no pagination; the entire tree loads at once, and long trees are navigated by scrolling.
Filtering and searching
All filters apply immediately; no button press is needed. Selections are saved in the page URL, so sharing the URL opens the same tree and filters.
| Field | Purpose | Tip |
|---|---|---|
| Category tree | Selects which tree to display. | If none selected, the first tree in the list opens. Changing the tree clears the search box and resets open/closed nodes to the top. |
| Search | Searches within category name, category code, and URL (placeholder: "Name, category code or URL"). | Results update as you type. Only matching categories and their ancestors remain visible; matches are bold and highlighted, their paths expanded. Case matching follows Turkish rules (including I/İ distinction). |
| Published | Shows categories that are published (Yes) or not published (No). Leaving empty (All) disables this filter. | Root categories always remain listed regardless of filter. Categories whose parent is filtered out appear at the top level. |
| Archived | Shows archived (Yes) or non-archived (No) categories; All disables this filter. | The root and parent category rule above also applies here. |
| Expired | Shows categories with expired (Yes) or non-expired (No) expiry dates; All disables this filter. | The root and parent category rule above also applies here. |
Icon buttons on the right of the filter bar:
- Expand all / Collapse all: Opens or closes all nodes in the tree at once. When the screen first opens, only root categories are expanded, showing the second level.
- Retry (refresh icon): Reloads the tree from the server; the icon spins while loading.
- Columns: Choose which columns are visible. The Category column cannot be hidden. Your selection is remembered in this browser.
List
Each row represents a category. Sibling categories are ordered by the Order value; those without order fall to the end alphabetically. Rows with subcategories have an arrow on the left to expand/collapse the node.
| Column | Meaning |
|---|---|
| Category | The category name; its full path (with parent categories) is shown below in gray. |
| Category code | The category code. The code is assigned when the category is created and cannot be changed later. |
| Full path | The path from the root to the category. Hidden by default. |
| URL | The URL segment of the category on the storefront. |
| Order | Display order among sibling categories. |
| Status | Badge showing Published (green) or Not published (gray); if expired, shows Expired (red), if expiring soon, Expiring soon (orange). |
| Archived | Yes / No. Hidden by default. |
| Actions | Row buttons (visible only to accounts with write permission, see Actions). |
Root categories do not show a publish badge in the Status column; the Archived column shows "—"; you can see the real publish and archive status on the detail page.
Clicking a row opens the category detail page. For details, see Category detail.
Actions
The following write actions are visible only to accounts with category write permission. After each successful action, a Saved or Deleted notification appears and the tree refreshes. While an action is in progress, other write buttons are disabled.
Adding a root category
Used to add a new category at the top level of the tree.
- Ensure the correct tree is selected in the Category tree field.
- Click the Add root category button in the header. The Create category window opens with the description "Will be added to the root of the tree."
- Enter the name in the Category field (up to 250 characters).
- When you stop typing, the Category code field fills with a suggested code based on the naming rule in your setup. While suggesting, the field shows "Fetching code suggestion…", then "Code suggested from name according to rule; you can change it." You can edit the code (up to 100 characters). If you manually change the code, it will no longer update automatically when the name changes.
- Click Save.
The Category code field is disabled until a name is entered; Save is disabled until both name and code are filled. The category code cannot be changed later, so verify before saving. Closing the window with Cancel or Close clears entered name and code.
Adding a subcategory
- Click the Add subcategory (plus icon) button on the row of the parent category.
- The window opens with the description "Will be added under <parent category>."
- Enter the name and code as with adding a root category, then click Save.
The new category is added under the selected category.
Moving order by one step
The Move up and Move down buttons on a row move the category one position up or down among siblings. The action applies immediately without confirmation. Rows without a category code have these buttons disabled.
Moving to a specific position
Used to move a category multiple steps at once.
- Click the Move to position button on the row.
- The popup shows "<name> category will be moved to the order of the selected sibling." Select the target sibling category from the Target sibling category list.
- The move applies immediately without confirmation, a Saved notification appears, and the window closes.
Only siblings with the same parent appear in the list. The Close and Cancel buttons close the window without moving; moving happens only when a selection is made.
Drag-and-drop ordering
If you have write permission, you can drag a row and drop it onto another sibling with the same parent to reorder; the dragged category takes the order of the sibling it is dropped on. Dropping onto a category with a different parent is not allowed: dragging only changes order, not the parent category. No confirmation is asked.
Deleting a category
- Click the Delete (trash icon) button on the row.
- The Delete this category? window opens with the warning "<name> will be permanently deleted. This action cannot be undone."
- Confirm with Delete or close with Cancel.
Deletion is irreversible. The warning does not mention subcategories or linked products; check the structure before deleting a category with subcategories. If unsure, consider unpublishing the category from the detail page instead. You can also delete the category from the detail page's Delete button.
Importing categories from Excel
Used to fill a newly created, empty tree with categories from an Excel file in one operation.
- Open the Import menu and download the empty Excel template via Download template.
- The first row of the template is a header and not imported; fill one row per category (see table below).
- Select the correct tree and ensure all status filters are set to All.
- Click Import from Excel and select your
.xlsxfile. - The Import categories from Excel window shows "Categories in <file> will be imported into <tree>…" Confirm with Import from Excel or close with Cancel.
- When done, a "N categories imported" notification appears and the tree refreshes.
The template columns are read left to right in this order; do not change headers or column order:
| Column | Content |
|---|---|
CategoryId |
Category code. |
ParentCategoryId |
Parent category code. Leave empty for root categories. |
Name |
Category name. |
CategoryTreeId |
Ignored; categories are imported into the selected tree on screen. |
Description |
Description. |
Url |
URL. |
MetaKeywords, MetaDescription, MetaTitle |
SEO fields. |
IsBreadcrumb |
Show in breadcrumb: 1 or true for yes, any other value for no. |
PageSize |
Page size (integer; 0 if empty or invalid). |
Published |
Published: 1 or true for yes, any other value for no. |
Import is atomic: if any row has an error, no categories are imported. Only the first sheet is read (up to 20,000 rows); a file with only the header row causes an error. The Import from Excel button is enabled only when the selected tree is empty and no status filter is applied.
Opening category templates
The Templates button in the header opens the screen where you manage category templates for the selected tree. The button is disabled if no tree is selected. For details, see Category templates.
Viewing channel category trees
The Channel category trees button lets you view marketplace and sales channel category trees in read-only mode.
- Click the button to open the window.
- Select a channel from the Channel list. Without selection, the message "Select a channel first" is shown.
- The channel's tree is listed with Channel category and Channel category id columns. You can search by name or category code using the Search box.
No changes can be made in this window. To map a category to a channel category, use the Channel mappings tab on the category detail page.
Statuses
| Status (on screen) | Meaning | Next step |
|---|---|---|
| Published | The category is marked as published. | — |
| Not published | The category is not published. | To publish, go to the detail page, click Edit, check the Published box in Flags, and click Save. |
| Expired | The category's expiry date has passed. | On the detail page, click Edit, update or clear the Expiry date field (empty = no expiry), and save. |
| Expiring soon | The expiry date is approaching. | If the category should remain published, extend the expiry date. |
Common situations
- The list is empty, showing "No records found." No categories match the selected filters or the tree is empty. Set all status filters to All. If the tree is truly empty, add categories or import from Excel.
- "Select a category tree" message appears. No tree is available to open; a category tree may not be defined in your setup. Check the Category tree list.
- The category I searched for does not appear. Clear the Search box and status filters first; search only shows matches in name, code, and URL. When a status filter is applied, a category whose parent is filtered out may appear at the top level; check the top of the list.
- Root categories remain listed after filtering. Root categories always remain as the tree's container; their own publish and archive status are not shown in the list.
- The Import from Excel button is disabled. This is enabled only on empty trees with no filters applied. To add categories to a non-empty tree, use Add root category or Add subcategory.
- I cannot move a category under a different parent. Drag-and-drop and Move to position only reorder siblings. The parent category field cannot be changed on this screen or the detail page.
- "PIM service not configured." message appears. Your setup lacks a product information management connection. Contact your system administrator. If you see "Something went wrong," click Retry; if the problem persists, notify your system administrator.