Products
Filter PIM products by code, type, category, attribute, channel, and code file; export to Excel and perform bulk operations on selected products.
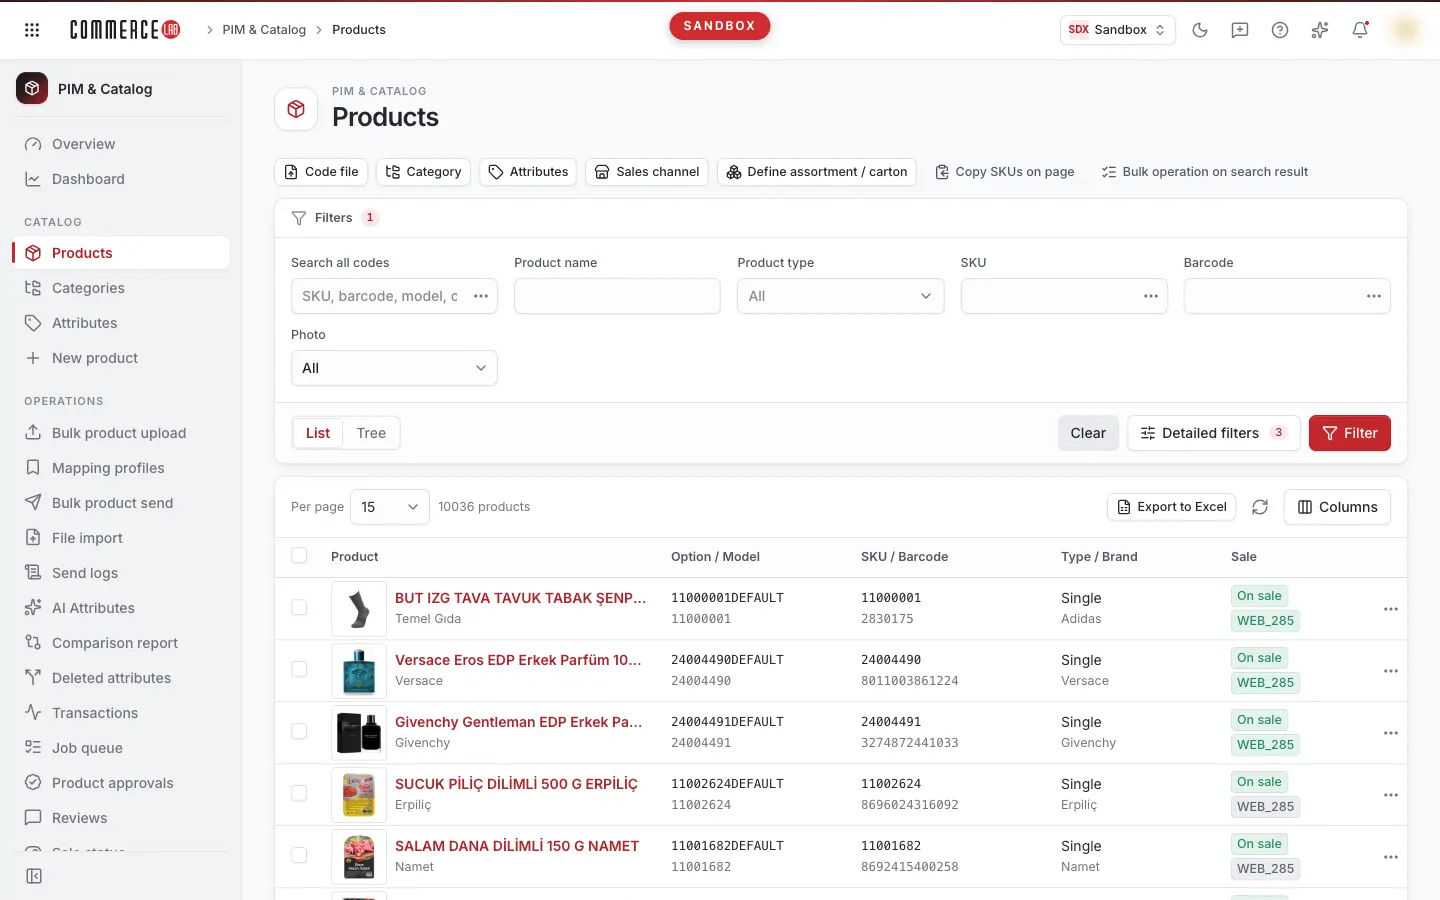
The Products screen is the main catalog list where product records in PIM are searched, filtered, and processed in bulk. Each row shows a product's codes, brand, general sale status, whether it is open for sale per channel, stock, and price. Catalog and e-commerce teams use this screen to find products, export the list to Excel, and bulk update the sale status, attributes, categories, or campaigns of selected products. To edit all details of a single product, click the product name to go to the Product detail page.
Accessing the screen
Follow the menu path PIM & Catalog › Catalog › Products. If you do not see it in the menu, your account does not have permission for this screen.
You can also arrive at this list filtered from other screens:
- The Open in product list button in category details opens the list filtered by that category.
- In the Product lists screen, clicking a list name or the Open products link opens the list filtered by that product list.
- Clicking an option code in the Deleted attributes report opens the list filtered by that option code.
- When you delete a product in product detail, this list opens.
The screen URL carries applied filters; you can copy and share a filtered list link (except for the code file filter, see below). On opening the link, filter fields with values automatically appear on the recipient's screen.
Screen sections
From top to bottom:
- Selected products (N) bar, visible only if you have added products to the selection across pages.
- Code file badge, visible only if you have uploaded a single code file.
- Filter buttons: Code file, Category, Attributes, and Sales channel. Next to them are Copy SKUs on page and Bulk operation on search result buttons.
- Filter card: text and selection filters, List / Tree view toggle, Clear, Detailed filters, and Filter buttons.
- List card: Per page selection, "N products" result count, Export to Excel button, refresh icon, Columns menu, table, and pagination.
- In tree view, a short note below the table explaining how this view works.
Filtering and searching
Values entered in the filter card fields are not applied immediately. Press Filter or Enter in a field to apply. If there are unapplied changes, the Filter button is highlighted.
Clear empties all fields in the filter card and refreshes the list immediately. It does not change category, attribute, sales channel filters, code file, or List / Tree selection.
Always visible fields
| Field | Purpose | Tip |
|---|---|---|
| Code search | Searches SKU, model code, option code, and barcode fields. | Does not search product name; use Product name for that. You can enter multiple codes separated by commas. The Enter multiple values icon to the right opens a box where you paste one code per line. Pasting multi-line text directly into the field has the same effect. |
| Product name | Filters by product name. | Can be used together with Code search. |
| Product type | Narrows the list to selected product types. | By default, option, single, and package types are selected; model and variant (SKU) records do not appear. To see all types, leave only All (no type filter) checked; if other types are also checked, the filter works accordingly. Removing all checks resets to default types. This field is hidden in Tree view. |
Detailed filters
Select fields to use from the Detailed filters menu. Selected fields are added to the filter card; the number of added fields is shown next to the button. Your selection is remembered in this browser. By default, SKU and Barcode are selected. Unchecking a field clears its value; press Filter to apply changes.
| Field | Purpose | Tip |
|---|---|---|
| SKU | Filters by SKU. | You can enter multiple SKUs separated by commas or using Enter multiple values. |
| Model code | Filters by model code. | Enter a single value. |
| Option code | Filters by option code. | Enter a single value. |
| Barcode | Filters by barcode. | You can enter multiple barcodes separated by commas or using Enter multiple values. |
| External code | Filters by the product's external system code. | Enter a single value. |
| Product list | Returns products in selected product lists. | Only product lists appear as options. Manage lists in the Product lists screen. |
| Catalog | Returns products in selected catalogs. | You can select multiple catalogs. |
| Photo | Returns products with (Exists) or without (Missing) photos. | Select Missing to find products without images. |
| Video | Returns products with or without videos. | |
| Category | Returns products with or without a category. | Select Missing to find uncategorized products. |
| Stock | Returns products with or without stock. | |
| Price | Returns products with or without price. | Select Missing to find products without price. |
| Active / salable | Returns products open or closed for sale. |
If All remains selected in Exists / Missing fields, that filter is not applied.
Boxed filters
Each of the four buttons above the filter card opens its own box. These filters apply immediately when you press Apply inside the box; you do not need to press Filter. The Clear button inside only removes that filter. When active, the button is highlighted and shows a count in parentheses: number of selected categories for Category, number of rules for Attributes and Sales channel (e.g., Attributes (2)).
Category
- Select the tree from the Category tree list. Changing the tree clears previous category selections.
- Check one or more categories in the Category field. Categories are listed and searchable by full path.
- Press Apply. Products in the selected categories are listed.
Attributes (one rule per row)
- Open a new row with Add rule.
- Select an Attribute. Choose Equals, Does not equal, or Has no value in Comparison.
- For Equals and Does not equal, select a value from the Value list of defined attribute values. Selecting Has no value hides the value field; this rule finds products with empty attribute.
- To delete a rule, press the cross (Remove) at the end of the row. After setting rules, press Apply.
Rules with Equals or Does not equal but no selected value are silently ignored. Loading the attribute list may take some time; a progress bar appears in the box while loading.
Sales channel (filters by sale status per channel)
- Add a row with Add rule and select a Channel.
- In Sale state, choose Light, Off, Off (default), or On or off. New rows default to Light.
- In In row, select Show or Hide. Channels set to Hide do not show as badges in the list rows.
- Press Apply.
Code file (filters by your option code list)
- Press the Code file button and select a CSV or TXT file containing option codes. The button shows "Loading" while processing.
- Codes can be separated by newline, comma, semicolon, or tab. Quotes are removed, duplicates counted once, values longer than 100 characters ignored. Maximum 20,000 codes per file.
- When matching products are found, a message appears: "M codes matched N products; list filtered by these products." A Code file: N products (M codes) badge and file name appear above the list.
- To remove the filter, press the cross (Remove code file filter) next to the badge.
If the file is rejected, one of these warnings appears: "No option codes found in file.", "File contains N codes; maximum 20000 allowed.", or "None of the N codes matched any product." The list remains unchanged.
The code file filter works together with other filters. Export to Excel and Bulk operation on search result apply only to these products. The code list is stored only in that browser tab: refreshing keeps the filter, but opening the link in another tab or by another user shows "Code file filter in link is not in this tab; list shown unfiltered." Use Clear in the warning to remove it and reload the file if needed.
List
The list opens with 15 records per page; you can select 15, 30, 50, 100, or 250 in Per page. Page and page size changes apply immediately. The list cannot be sorted by columns. You can hide or show columns from the Columns menu; your selection is remembered in this browser. The refresh icon reloads the list without changing filters.
| Column | Meaning |
|---|---|
| Product | Small image, product name, and below color (with category if available). If no name, SKU is shown. The name is a link opening product detail. Products without images show a dashed empty box. This column cannot be hidden. |
| Option / Model | Option code on top, model code below. |
| SKU / Barcode | SKU on top, barcode below. |
| Type / Brand | Product type, brand below. |
| Sale | General sale status badge (On sale green, Off sale gray) and channel badges below. Green badge means product is on sale in that channel, red means off sale, gray means undecided; hovering shows status. Open channels appear first, then closed, then undecided. More than five badges open with a +N button, which closes with Show less. |
| Stock | Stock quantity. Hidden by default; enable from Columns menu. |
| Price | Sale price (or list price if sale price missing) and currency. If list price differs from sale price, it is shown struck through below. |
Cells without value show "—". Clicking empty space in a row does nothing; click the product name for details. The three-dot menu on the right includes Open detail and Show in store.
Tree view
Change List / Tree in the filter card and press Filter. Before filtering, "View changed" appears in place of the table.
- Tree view lists only model records; single and package products without a model do not appear. The Product type filter is hidden.
- The arrow left of the product name (Show options) expands options under the model. Multiple models can be expanded simultaneously.
- The expanded section shows columns: Name / Code, Type (with Option or Variant badge), Color, Size, and SKU / Barcode. SKU is shown on option rows, barcode on variant rows. Size appears only on variant rows. On narrow screens, SKU / Barcode is hidden.
- The arrow on option rows (Show variants) expands variants of that option. This arrow is disabled if the option code is missing.
- The code link in each row opens that record's detail.
In tree view, the result count is the number of models. Export to Excel and Bulk operation on search result operate by product type selection in list view, not tree view. Use these operations in List view.
Operations
Opening product and viewing in store
- Click the product name or select Open detail from the three-dot menu to open product detail.
- Show in store opens a box listing store page links per channel; links open in new tabs. If no address, the box shows "Store address not found"; below is the last web submission result or a note "Product may not have been sent to web channel yet."
Row selection and operations with selected products
Selecting products with checkboxes opens a "N records selected" bar above the table. Buttons on the bar:
| Button | Action |
|---|---|
| Add to selection (across pages) | Adds selected rows to the selection across pages (see below). Shows "N products added to selection"; products already in selection are ignored. |
| Copy SKUs | Copies SKUs of selected products line by line to clipboard; shows "N SKUs copied". Rows without SKU are skipped; if none have SKU, nothing is copied. |
| Export selected | Downloads selected products with the columns last saved in Export to Excel (or default columns if none saved). The file is prepared based on selected products, not current filters. |
| Bulk operation | Opens the bulk operation box for selected products. |
| Clear selection | Clears the selection. |
After Copy SKUs or Export selected, the table selection is cleared.
Table selection resets when page, page size, or filters change. Use Add to selection (across pages) to work with products from different pages together.
Selection across pages
When you add products to selection, the Selected products (N) bar appears above the list. This selection persists across page and filter changes; it is stored in this browser and for the current setup, and remains after closing and reopening the page. Up to 5,000 products can be added; excess are not added.
- Show selected lists selected products with images, names, and codes. The cross (Remove from selection) on each row removes that product from selection.
- Undo restores the last removed product; pressing repeatedly restores earlier removals.
- Bulk operation, Export selected, and Copy SKUs operate on the selection. Export to Excel supports up to 1,000 products; above that, a warning "Export with ID supports up to 1000 products; narrow your selection." appears and no file downloads.
- Clear asks "Remove N products from selection?" Confirming empties the selection; this cannot be undone with Undo. Cancel keeps the selection.
Copy SKUs on page
Copies all SKUs visible on the current page line by line to clipboard; shows "N SKUs copied". Rows without SKU are skipped.
Export to Excel
- Click Export to Excel in the list card.
- In Columns, check the columns you want in the file. Attributes (like color, size) appear as columns; you can search by name. On first use, columns matching visible info are preselected. If you uncheck all, default columns are reselected.
- Click Download. The file is prepared based on current filters and downloaded by your browser. If the code file filter is active, only those products are exported.
Your column selection is saved in this browser and used next time and in Export selected.
Bulk operation
The bulk operation box opens in three ways:
- Selecting rows in the table and clicking Bulk operation in the bar.
- Clicking Bulk operation in the Selected products (N) bar (for selection across pages).
- Clicking Bulk operation on search result without any selection, targeting all products matching current filters.
The box has three steps: Bulk operation (products, operation, and fields), Summary (company and confirmation), and Operation result.
Step 1: select products and operation
- Selected products are listed at the top. Remove a product by clicking the cross (Remove from selection); Undo restores the last removed. If 300 or more products are selected, only the count is shown. If targeting all search results, it says "All N products in search result."
- Choose the operation in Operation; a short description appears below. Changing the operation resets the selected Entity list.
- In Target, choose Selected N products or All search results (N). If no products are selected, this field is disabled and targets all search results.
- Fill operation-specific fields (see table below). Required fields must be filled to enable Next. Cancel closes the box.
| Operation | Fields to fill |
|---|---|
| Update sale status | Entity list (content lists), Language, and Sales channels. For each channel, select Open for sale or Close for sale; leaving as Leave as is keeps the channel unchanged. At least one channel must be selected. Optional from / to dates. |
| Add attribute | Entity list (attribute lists), Attributes, Value, and Process type (Add or update or Add only). If the attribute has no defined value, you can type it manually in Value. Optional from / to dates. |
| Remove attribute | Entity list, Attributes, and Value. Optional from / to dates. |
| Add to category / Remove from category | Category tree and one or more Category. Changing the tree clears category selection. |
| 3rd price campaign | Entity list (price lists) and Currency. To link products to an existing campaign, select Campaign. To create a new campaign here, check Create a new campaign; enter Campaign name (max 200 characters), Price field (Sale price or List price), Account (Percentage or Total), and Rate. Optionally, add a badge with Add badge, specifying Badge attribute and Badge value; both are required if checked. from / to dates apply only to new campaign validity; ignored when linking to existing campaigns. |
| Assign products to vendor | One or more Vendor / supplier. This operation appears only if your setup allows assigning products to vendors. Selected products are assigned with their entire model tree; content, category, attribute, image, price, and sale info are copied and auto-approved. |
| AI attribute suggestion | Category / attribute source, Model, Auto-approve confidence (default Off; options 95%, 90%, or 80%), and Consider the current category. Nothing is written to PIM; suggestions are approved in the AI Attribute screen. |
The + button next to list selections (New list) opens a New list name field inline. Enter a name and press Create (or Enter) to create and select the list; a "… list ready" notification appears. Esc or Cancel closes the field. If a list with the same name exists, it is selected instead of creating a new one.
The pencil and + buttons next to Attributes, Value, and Badge attribute / Badge value (Edit attribute, New attribute, Edit value, New value) let you edit attribute or value definitions inline. These buttons appear only if you have product write permission. See Attributes — detail for form details.
Validation rules:
- to date cannot be before from ("End date cannot be before start date").
- In new campaigns, Rate must be greater than zero ("Amount must be greater than zero"); if Percentage is selected, it cannot exceed 100 ("Percentage must be between 0 and 100").
- Assign products to vendor and AI attribute suggestion require selecting products individually. In these operations, Target is disabled; if no products are selected, a warning appears and Next is disabled.
Step 2: summary and confirmation
- Review the line "The operation '…' will be performed on N products." and the summary below (selected channels, categories, attribute and value, campaign, suppliers, or AI settings).
- Select the company from Company; the first company is selected by default. This field is absent in AI attribute suggestion.
- If targeting all search results, check "I understand N products will be updated." The apply button is disabled until checked.
- Click Apply to N products (or Start for N products in AI suggestion). Use Back to return to step 1.
If the operation is rejected, a "Something went wrong" notification appears with an error message, and the box remains open at the summary step.
Step 3: result
- The operation is queued and an Operation id is shown. The Operation detail link opens the operation details in the Operations screen. If available, Status, Products count, Created campaign, and Message are also shown.
- If some products failed, under "Error in N products" product IDs (clickable to open product detail) and error descriptions are listed. If no errors, "Bulk operation queued" is shown.
- For Assign products to vendor, a table per supplier shows Vendor / supplier, Status (Confirm or error), Assigned, Skipped, Confirm (Approved), and Message columns. Hovering over Skipped shows skipped models.
- When AI attribute suggestion starts, the box closes, a "AI job started" notification appears, and the AI Attribute Extraction screen opens for live tracking.
At the result step, the list refreshes (except after vendor assignment; use the refresh icon). Bulk changes are processed via queue, so may not appear immediately. There is no undo button for completed bulk operations; fix errors with reverse operations (e.g., Remove from category or Remove attribute).
Statuses
| Status (on screen) | Meaning | Next step |
|---|---|---|
| On sale | The product's general sale status is open. | Check channel badges for sale status per channel. |
| Off sale | The product's general sale status is closed. | Use the Salability tab in product detail or Update sale status bulk operation to open for sale. |
| Green channel badge | Product is on sale in that channel (On sale). | |
| Red channel badge | Product is off sale in that channel (Off sale). | |
| Gray channel badge | No decision for that channel (Undecided). | Set channel value in product detail if needed. |
Common situations
- The model or variant I am looking for is not in the list. By default, Product type filter shows only option, single, and package types. Leave only All (no type filter) checked or switch to Tree view and expand models.
- I typed product name in code field but got no results. Code search does not search product name. Use Product name field.
- I switched to Tree view and see "View changed" in the table. View change applies after pressing Filter.
- I expanded a model in tree and see "This model has no options." or "No model code in row; options cannot be fetched." The model has no option records or the model code is empty. If "Failed to fetch sub-records." appears, close and reopen the row.
- I see "No records found." Your filters may be too restrictive. Check highlighted filter buttons and code file badge; use Clear to start over.
- I see "PIM service not configured." Product data is not connected in this setup; contact your system administrator.
- Changes are not visible after bulk operation. The operation is queued; refresh the list after some time. Track operation status via Operation detail link or Operations screen.
Related screens
Video tutorials
- Searching and filtering in product list: Search all codes in product list, select filters with Detailed filters, combine filters to find missing products, paste code lists, and export to Excel; step-by-step guide with video.