Bulk product import
Add or update products in PIM in bulk using an Excel template: download the template, upload the file, map columns, preview the plan, and send.
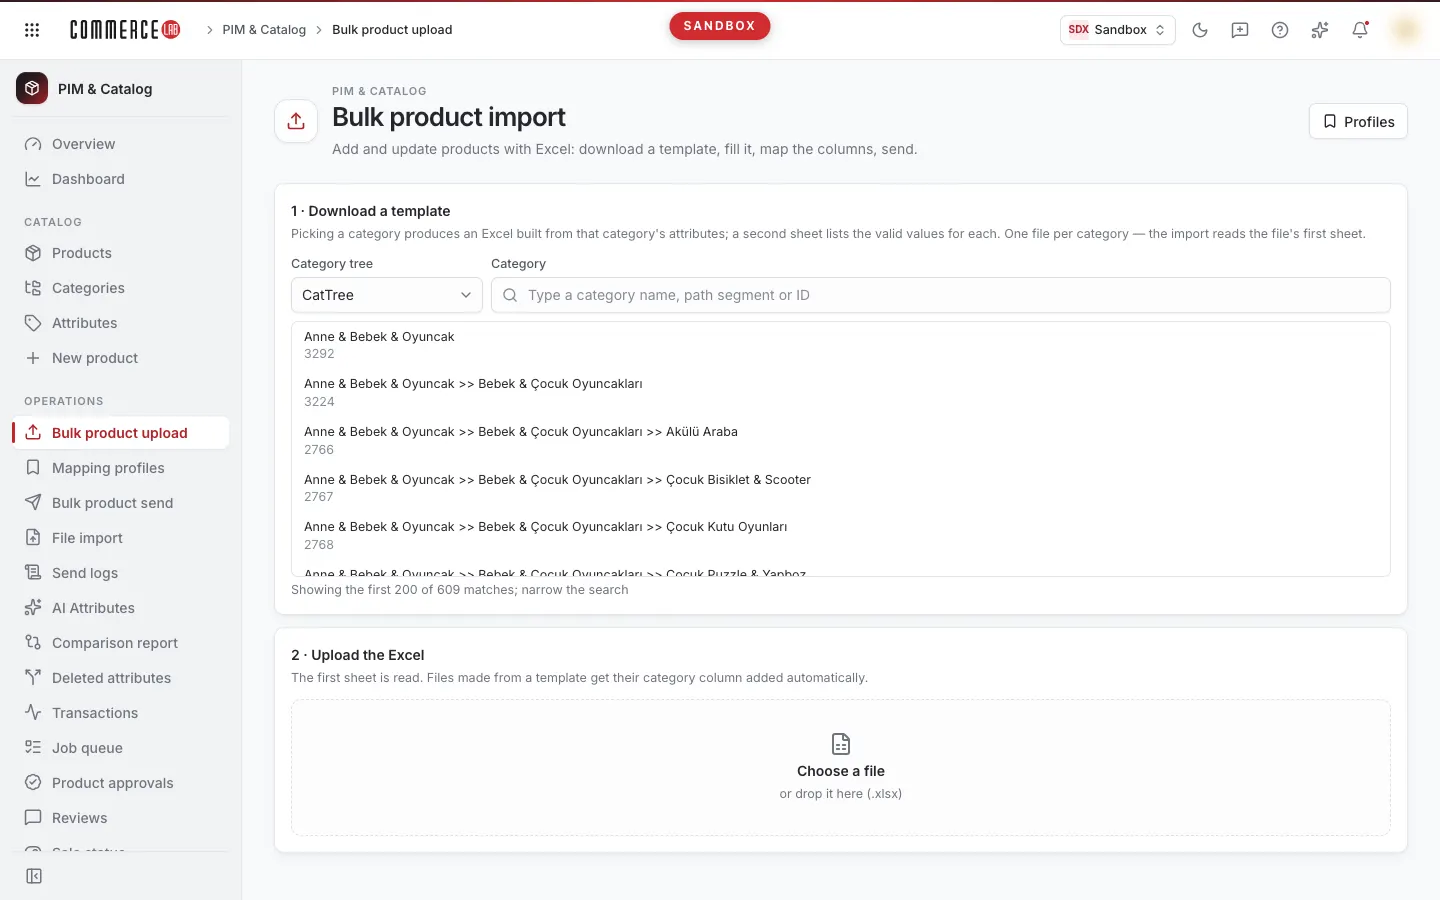
Bulk product import screen is where you add many products to PIM at once or update existing products using an Excel file. The flow consists of five steps: download a template by category, upload the completed file, map Excel columns to product fields, compute the plan showing what will be sent before sending, and then send. Catalog teams use this screen to open new season products or update prices, content, or attributes in bulk.
Accessing the screen
Navigate from the menu: PIM & Catalog › Operation › Bulk product import. If you do not see it in the menu, your account does not have permission for this screen.
Screen sections
The screen is single-page and steps open sequentially: mapping is not visible before file upload, and plan and sending are not visible before mapping.
- Title: Bulk product import and the description "Add and update products with Excel: download template, fill, map columns, send." After file upload, the Start over button appears at top right.
- 1 · Download a template: blank Excel template by category.
- 2 · Upload the Excel: file upload area; after upload, file summary.
- File preview: first rows of the uploaded file.
- 3 · Column mapping: which product field each Excel column writes to.
- Send plan: number of products and requests to be sent, rule violations if any; Company selection and Send to button.
- 5 · Result: processing status of each part after sending.
If selection lists used by the screen fail to load, a Something went wrong error and Retry button appear.
Important: Work on the screen (uploaded file, mapping, plan) is kept only on the open page. If you refresh or navigate away, you must upload the file again.
Step 1 · Download a template
An Excel template is generated from the attributes of the selected category. The second sheet lists valid values for each attribute; you can refer to this list to enter correct values while filling cells.
- Select the Category tree (default is the first tree).
- Select the category from the Category list (Pick a category). Categories are listed with full paths.
- Click Add. The category is added below the card with its name and ID.
- Click the Download template button in the row; the file downloads to your browser's download folder.
You can add multiple categories; a separate file downloads for each because import reads only the first sheet of the file. You can remove an added category from the list with Remove (cross).
Tip: The category information is stored inside the template-generated file; when you upload the file, the category column is added automatically and a "Category: …" badge appears in the summary row. Because the template’s column headers carry attribute IDs, Auto map correctly binds attribute columns to attributes.
Using a template is not mandatory; you can upload your own prepared Excel file and map columns manually.
Step 2 · Upload the Excel
- Click Choose a file or drag the file into the area.
.xlsxand.xlsmfiles are accepted. - During upload, a percentage and progress bar appear next to the file name. You can cancel upload with Cancel.
- When upload completes, a Server is processing badge appears; the file is being read.
- After reading, the card shows file name, sheet name, number of rows ("N rows"), number of columns ("N columns"), and a category badge if from a template.
Only the first sheet of the file is read.
Error cases:
- If the file cannot be uploaded or read, a Upload failed badge and error message appear in the row, and a "File could not be read" notification appears on screen. Retry reloads the same file without needing to reselect.
- If the file contains multiple columns with the same header, a "Duplicate columns in file" notification lists the repeated headers and the file is not loaded. Fix the headers and reload.
To switch to another file, click Start over in the header. This clears the file, mapping, plan, and results list without confirmation.
File preview
The first 5 rows of the file are shown as a table. Show more reveals 5 more rows each time; below it shows your current row position like "5 / 120 rows." You can check what an unclear column actually contains before mapping. Columns with empty headers are shown with sequence numbers like #3. If the file has no data rows, the preview card does not appear.
Step 3 · Column mapping
There is one row per Excel column. The badge at the top of the card shows how many columns are mapped ("8 / 24 columns mapped"). Unmapped columns are excluded from sending.
| Column | Meaning |
|---|---|
| Excel column | Column header and below it the first row’s value (as example). |
| Target field | Product field the column writes to. Selected from the Select list; selection can be removed with the cross (Remove). |
| List | List where the target field is written (category tree, product list, content, price, image list, or attribute set). When target is selected, the first list is default. For fields in the Main group or if no suitable list exists in setup, — appears. |
| Language / currency | For language-dependent fields, Language; for price fields, Currency. Defaults to first language and currency. |
Target fields
Options in the target list are in "Group · Field" format:
| Group | Fields | Note |
|---|---|---|
| Main | Id, Barcode, Sku, OptionCode, Model, Type |
Product identity fields. Which main fields you map determines how sending is done (see below). |
| Category | CategoryId |
Category to which product is linked. Category tree list, language selection also required. |
| Product list | ProductList |
Cell value is not used: all rows are added to the selected product list. |
| Content | Name, Title, SeoDescription, ShortDescription, Description, OtherDescription, OnSale, IsSalable and your setup’s custom content fields |
Content list selected; language selection required. |
| Price | ListPrice, SalePrice, VatRate |
All three require currency selection. Price list selected for ListPrice and SalePrice, content list for VatRate. |
| Image | Picture |
Image list selected. |
| Attribute | Attributes from setup, by name | Attribute set selected; language selection required. |
Main field rule
PIM products can be updated in three scopes; the scope is determined by the main fields you map:
| Mapped main fields | What is sent | Badge shown in plan |
|---|---|---|
Only Sku |
Only variant-level records are updated. | ModelOnlyChild |
Only OptionCode |
Only option-level records are updated. | ModelOnlyParent |
Model and at least one other main field |
Product, option, and model records are all sent. | Full record |
Any other combination (e.g. Sku and Barcode but no Model) causes a plan error: "Only Sku, only OptionCode, or all main fields must be mapped."
Auto mapping
The Auto map button tries to bind unmapped columns in this order:
- Matching attribute ID with the number at the end of template headers like
Name-123. - Exact match of header to a target field name (case insensitive).
- Phonetic similarity; e.g. "Barkod" header maps to
Barcodefield.
Manual mappings are not overwritten. Review results carefully; phonetic matches may be incorrect and the same target field can be bound to multiple columns. For each column with a selected target, list, language, and currency default from the first record; change in the row if needed. Clear removes all mappings.
New attribute by column name
If you have permission, the Attribute group in the target list includes *New attribute (by column name) at the top. If an Excel column contains an attribute not yet in setup:
- Select *New attribute (by column name) from the column’s Target field list.
- The "New attribute: <column name>" window opens; Attribute name is prefilled with the column name, Data type, Attribute type, Level, and Binding fields have default values. Change if needed; these four fields and the name are mandatory.
- Click Save. The attribute is created and mapped to this column ("Attribute created and mapped to column").
If the attribute is created but settings cannot be written, a warning appears: "Attribute created and mapped but settings could not be saved; complete in the Attributes screen." In this case, open the attribute in the Attributes screen and complete settings. The form fields are described in Attributes — detail.
If no columns are mapped, a warning appears below the card: "Map at least one column to continue. Sku or OptionCode is mandatory."
Step 4 · Send plan
When mapping is ready, a card appears: "Mapping ready. Compute the plan to see what will be sent — no data is saved at this step."
- Click Compute the plan.
- Review the Send plan card:
- N product objects: number of records to send to PIM. Rows with the same option or model code merge into single option and model records, so this number may differ from row count.
- N requests: number of parts the send will be divided into. Each request contains up to 2000 product objects.
- Scope badge:
ModelOnlyChild,ModelOnlyParent, or Full record (see Main field rule). - View sample payload: shows a technical example of data to be sent; useful for support when investigating issues.
- Red rows indicate errors and block sending; yellow rows are warnings and do not block sending.
| Message | Level | Action |
|---|---|---|
| "Sku or OptionCode must be mapped." | Error | Map Sku or OptionCode to a column. |
| "At least one main field (Sku, Option, Model…) must be mapped." | Error | Map at least one main field. |
| "Same product code appears in multiple rows." | Error | The first 20 repeated codes are listed in parentheses. If Sku is mapped, SKUs are checked; otherwise option codes. Clean duplicate rows in the file. |
| "Only Sku, only OptionCode, or all main fields must be mapped." | Error | Correct main field mapping to one of the three scopes in the table. |
| "Product list not mapped; products will not be linked to any list." | Warning | If you want products added to a product list, map ProductList target to a column and select the list. |
If the plan cannot be computed, a Something went wrong notification appears with error details.
Any change in mapping (including list, language, or currency changes) invalidates the plan and the card disappears; you must click Compute the plan again. The Company selection resets and must be reselected before sending.
Step 5 · Sending and result
Sending
- Select the company to send products to from the Company list under the plan card (Pick a company). The company is intentionally empty by default to prevent sending to the wrong company; you must select each time. If not selected, a "Select a company before sending." warning appears.
- Click the Send to button. The button is disabled if the plan has errors, no company is selected, or sending has already been done.
- In the Confirm send window, it states "N product objects will be sent in M requests." Read the warning "Once sending starts it cannot be undone; results will be listed below." Confirm by clicking Send to. Cancel aborts sending.
- While sending, it shows "Sending… N requests are sent sequentially, this may take a few minutes." The progress bar shows which part is sending, e.g. "Part 2 / 5 sending." Stay on the page until sending completes because the result list appears only here.
- When done, a Sent notification appears and the card says "Sent. For a new file, click “Start over”." The same file cannot be sent twice.
If sending ends with an error, a Something went wrong notification appears, no result card is created, and Send to becomes usable again.
Result
The 5 · Result card contains one row per part:
| Item | Meaning |
|---|---|
| Part N | Which part of the send it is. |
| Operation number | Operation opened in PIM for the part. If you have permission, it is a link opening operation details in a new tab; the Copy button copies the number to clipboard. |
| Status badge | Status of the operation: SUCCESS (green), ERROR (red), or other processing statuses (blue). If status not yet received, shows Pending. A spinning icon appears while processing. |
| Status message | Explanation returned by PIM for the operation. |
| N products · M errors | Visible when product results arrive; green check if no errors. Clicking opens the Product results window. |
Status updates automatically every 2 seconds until SUCCESS or ERROR; no page refresh needed.
The Product results window shows Product and Result columns for each product. Completed is green, other results are red.
If some parts failed to send, a warning appears: "Some parts failed to send; they appear as errors in the list below." These rows show — instead of operation number. If no operation number is returned for any part, a warning suggests the send may not have occurred; check the Operations screen.
Warning: Start over also clears the result card. If you have not saved operation numbers, do not click this button before operations complete.
Common situations
- "Send to" button is disabled. There is a red error in the plan, no Company selected, or this file has already been sent. Fix errors, select company; start a new send with Start over.
- Plan card disappeared. You changed mapping; the plan is valid only for the mapping it was computed for. Click Compute the plan again.
- "Duplicate columns in file" warning. Two columns have the same header in Excel. Change one header and reload the file.
- Auto mapping bound a column to the wrong field. Phonetic matching can be incorrect. Change the target in the row or remove with cross.
- Product object count does not match row count. In full record sending, rows with the same option and model codes merge into shared option and model records; these are added to the count.
- Sent but status does not change for a long time. Operations are processed in PIM in the background. Click the operation number to track details in the Operations screen.
Related screens
Video tutorials
- Bulk product update with Excel: Export products to Excel, edit fields like name and description in the file, map columns automatically and manually in Bulk product import screen, and send; step-by-step guide and video.