Monitoring sourcing setup with the Setup wizard
Read the status of seven steps on the Setup wizard dashboard and navigate through the six steps of the Order fulfilment costs wizard without saving; step-by-step explanation and video.
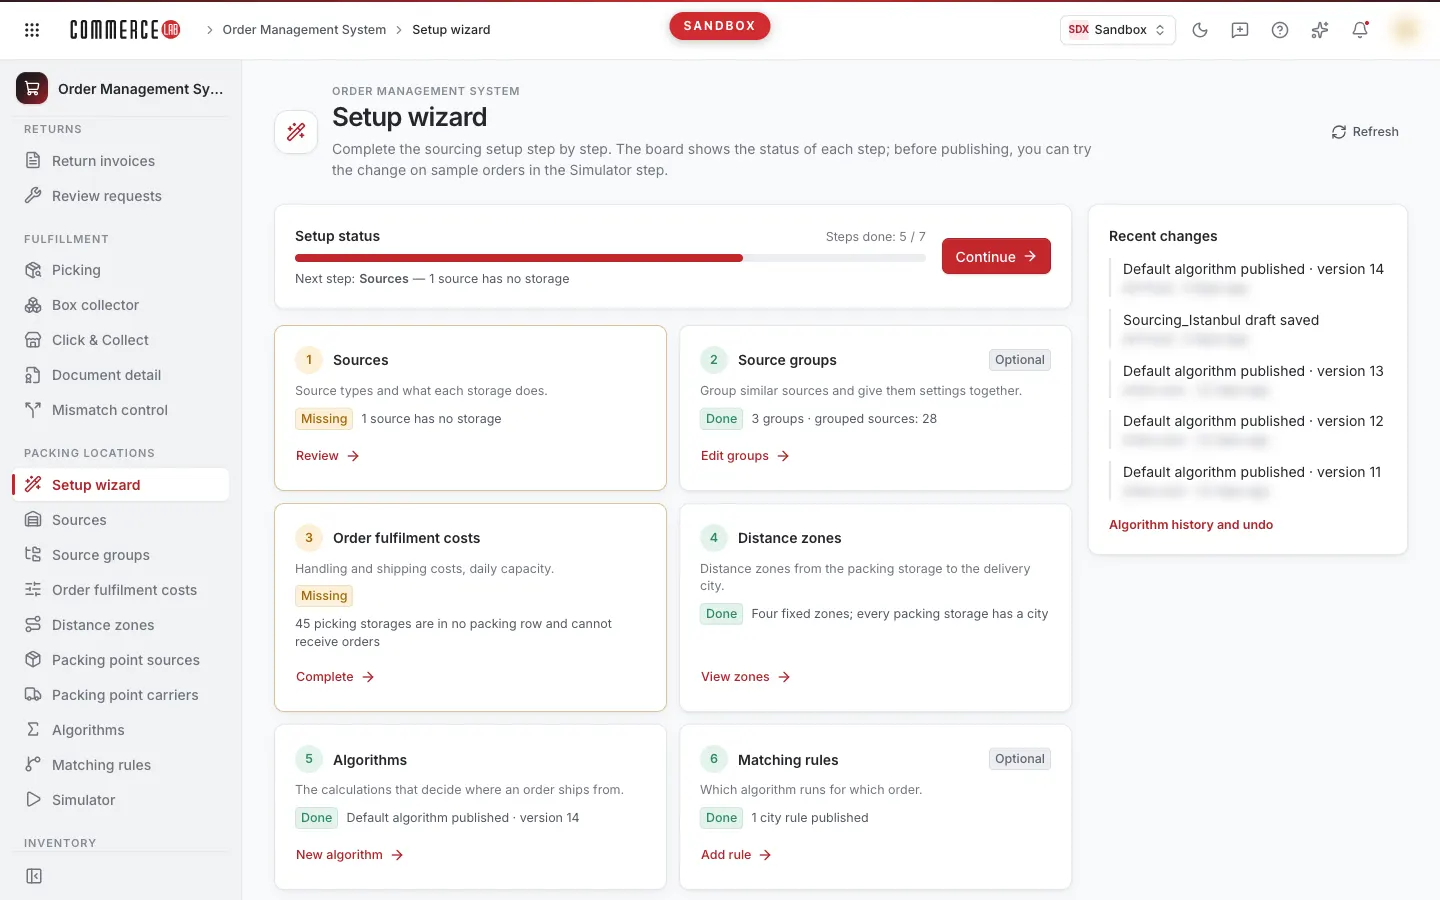
Setup wizard is the roadmap for sourcing settings that determine from which source the order will be fulfilled: it shows which step is complete and which is incomplete, and takes you to the relevant screen. This page describes the setup dashboard and the six steps of the Order fulfilment costs wizard; a video of the same explanation is below.
<video controls preload="metadata" playsinline width="1920" height="1080" poster="https://files.docs.hebiar.com/videos/console/oms/sourcing-wizard/ayar-sihirbazi.en.jpg" src="https://files.docs.hebiar.com/videos/console/oms/sourcing-wizard/ayar-sihirbazi.en.mp4"><a href="https://files.docs.hebiar.com/videos/console/oms/sourcing-wizard/ayar-sihirbazi.en.mp4">Open the video</a></video>
For card rules on the dashboard, Algorithm wizard, and saving details, see the Setup wizard document. Details of the steps: Understanding source types and stock layers, Grouping sources and group capabilities, Entering preparation and shipping costs in layers, Reading distance zones and packing point costs, Algorithms, Matching rules, Simulator.
Before you start
- Screen: OMS – Order Management › Packing locations › Setup wizard.
- Opening the dashboard and navigating from cards to screens does not change anything.
- Values in the cost wizard are saved only with Save only or Preview and apply. Writing permission for location and OwnerAdmin or TenantAdmin role is required to save and apply.
Setup dashboard
- Open the Setup wizard.
- Look at the Setup status at the top: how many steps are completed (e.g., "5 / 7 steps completed"), the next step, and what is missing. Continue takes you directly to the next step; Refresh recalculates the status.
- Read the cards in order. Each card’s status (Confirm, Incomplete) is calculated from your data:
- Sources: source types and which warehouse performs which task. For example, if there is a source without a warehouse, it shows Incomplete. Review opens the Sources screen.
- Source groups (optional): group similar sources and set their settings together. Edit groups.
- Order fulfilment costs: preparation and shipping costs, daily capacity. For example, if warehouses that pick are not assigned to any packing line, a "cannot take orders" warning appears. Complete opens the cost wizard.
- Distance groups: distance zones from packing warehouse to delivery city. Four zones are fixed; if the city of all packing warehouses is defined, the step is complete. View zones.
- Algorithms: calculations that decide from where the order will be dispatched. New algorithm.
- Matching rules (optional): which algorithm runs on which order. Add rule.
- Simulator: test with sample orders before publishing changes. Open the simulator.
- The Recent changes on the right lists algorithm publications and drafts. With Algorithm history and undo you can go to the algorithm history and revert to a previous version if needed.
Order fulfilment costs wizard
The Complete button on the cost card (or Set up with the wizard on the Order fulfilment costs screen) opens the wizard. You enter all settings for a group or General in six steps; use Continue to proceed and Back to return.
- Group: select General or a source group in response to "Which group are you setting up for?". If you select General, values apply to all sources; if you select a group, only that group’s sources are affected. The sales channel scope is shown below.
- Roles: "What can the sources in this group do?" Can pick orders, Can pack and ship itself, Sends to packing centres, and Pickup point for customer collection. If sending to packing centres is enabled, a list of packing centres (up to 3 points) appears.
- Basic costs: Storage, Goods receipt, Picking, Sorting, Packing, Warehouse–store transfer cost, Store picking cost, and Packaging (consumables) costs. If it packs itself and sends to a packing point, costs are calculated from these items.
- Shipping: "What is the shipping cost?" Enter prices for five zones for each shipment (Zone 1 · same city, Zone 2 · 100 km, Zone 3 · 500 km, Zone 4 · 500+ km, Fallback · if the zone is empty). Values not entered specifically for the group come from General.
- Capacity and performance: enter Daily target (units). Statistics are warehouse-based and the wizard does not write to them.
- Summary: all values you entered on one page. Bold values were entered in this group; those marked with "↳" come from the upper layer. You can export with Download as Excel.
Values are saved only with Save only (saves the profile) or Preview and apply (shows the difference and writes to tables). To exit without saving, press Back to the dashboard at the top left.
Checking the result
- After completing a step, return to the dashboard and press Refresh; the card status and Setup status update.
- Values applied in the cost wizard appear on the Order fulfilment costs screen and packing tables.
Common situations
- Card shows "Incomplete": the explanation below the card tells the reason; go to the related screen via the card button and fix it.
- Exited the wizard with no values: if you exit without using Save only or Preview and apply, nothing is saved.
- Save only button is dimmed: you have not changed any value yet; it is disabled when there are no changes.
- Save buttons not visible: you lack write permission for the location or do not have OwnerAdmin or TenantAdmin role; you can only view the wizard.