Product detail
Edit the salability, content, images, prices, categories, and attributes of a single product; track its operation history.
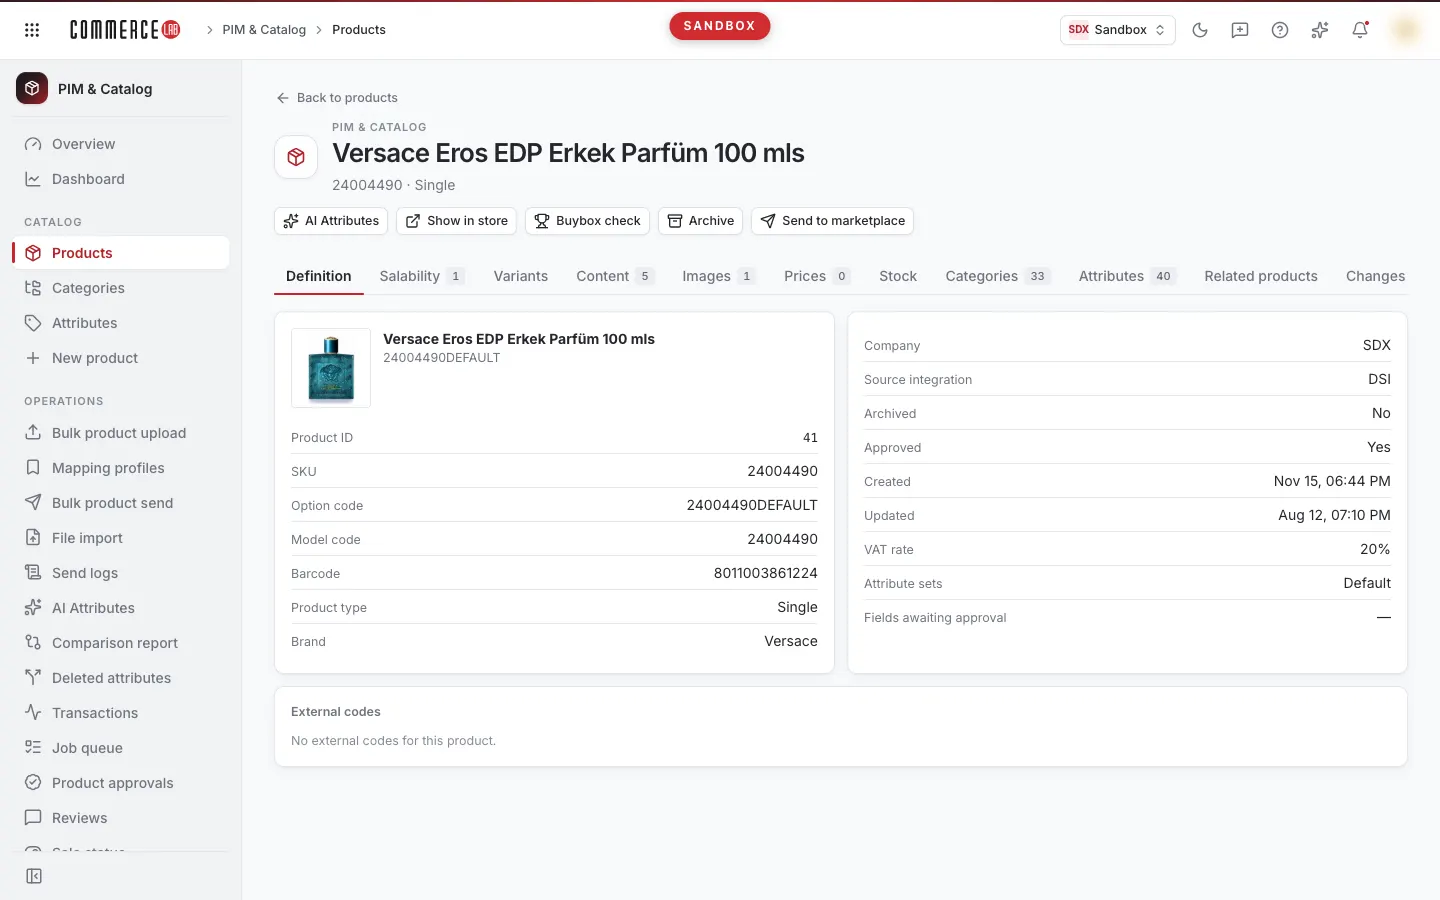
The product detail page displays the definition, salability, variants, content, images, prices, stock, categories, attributes, related products, and operation history of a single product in PIM in tabs; most of these can be edited here. Catalog and e-commerce teams use this page to prepare a product for sale, correct its content or price, and investigate why a change did not reach the channel. Use the Products list to find products and process many products together.
Accessing the screen
- Open the PIM & Catalog › Catalog › Products screen.
- Click on the product name in the list or select Open detail from the three-dot menu at the end of the row.
This page can also be opened from other links: codes in the tree view of the product list, variant and related product links on this page, product IDs in bulk operation results, and product names in order details. If you do not see Products in the menu, your account does not have permission for this screen.
Screen sections
- The Back to products button returns the browser to the previous page; if you came from the list, your filters are preserved.
- The title shows the product name (or SKU if no name), with SKU and product type below.
- Next to the title are status badges (Archived, Awaiting approval) and buttons:
- AI Attributes: visible if the product has an option code or SKU. The number next to it shows how many values were written by AI.
- Show in store: visible on every product.
- Buybox check: visible only on variants (SKUs) with barcode and single products.
- Archive / Unarchive and Send to marketplace: visible if you have product write permission.
- Delete product: visible if you have product write permission and the product is of option type.
- Tabs: Definition, Salability, Variants, Content, Images, Prices, Stock, Categories, Attributes, Related products, Changes, Actions, Raw data. The tabs Salability, Content, Images, Prices, Categories, and Attributes show the count of records next to them. The page opens with the Definition tab.
The source badge means the same in all tabs: Manual means the value was entered manually; From source means the value came from the system the product originated from (e.g., ERP transfer). If both manual and source values exist in the same place, the manual value is used; the source value is shown below in faded text or as "Source: …".
Operations
Archiving and unarchiving
- Press the Archive button in the header (or Unarchive if the product is archived).
- Confirm with Archive (or Unarchive) in the "Archive the product?" (or "Unarchive the product?") dialog; Cancel closes the dialog. Archived products do not appear in lists by default.
If successful, a notification "Product archived" or "Product unarchived" appears and the page refreshes. Archiving is always reversible.
Sending to marketplace
Sends the product, stock, or price data to the selected marketplace.
- Press Send to marketplace.
- Select the channel from the Marketplace list. The list consists of marketplace channels defined for the product's company; if none exist, the field shows "No marketplace channel defined for this product's company."
- Choose Product, Stock, or Price in the Send type field.
- The barcodes to be sent are listed in the box: "Barcodes to send (N): …". If the option record has no barcode, the barcodes of its variants are used. If no barcode exists, a warning "No barcodes to send: product and variants have empty barcodes." appears and sending is not possible.
- Check the warning "… data will be sent to … channel." and press Send. Send is disabled without marketplace, send type, and at least one barcode.
If successful, a notification "N barcodes queued for sending" appears. Monitor the sending result on the Sending logs screen.
Deleting a product
Visible only for option-type products and with product write permission.
- Press Delete product.
- Confirm with Delete product in the dialog stating "… record will be deleted from PIM. This action cannot be undone."
If successful, a notification "Product deleted" appears and the Products list opens. Deleted products cannot be restored.
Show in store
Show in store opens a box listing the product's store page links per channel; links open in a new tab. If no address exists, it shows "Store address not found"; below is the result of the last web send or the note "Product may not have been sent to the web channel yet."
Buybox check
Queries the Trendyol buybox status of the barcode; does not change the product. The box shows a table with a header for each Trendyol store ("Trendyol store · ipid … · seller …") and columns Barcode, Buybox rank, Buybox price, Multiple sellers. If Buybox rank is 1, the badge is green; otherwise, orange. The Raw Trendyol response section expands the full response.
If no data is returned, one of these messages appears: "Buybox information not retrieved", "No Trendyol store with credentials defined in this setup.", or "Trendyol did not return buybox information for this barcode."
AI Attributes
The AI Attributes button opens the AI Attribute Extraction screen with this product's option code (or SKU if none). There you can extract attribute suggestions from product images and approve them. Values transferred by AI are marked with an AI badge in the Attributes tab.
Statuses
| Status (on screen text) | Meaning | Next step |
|---|---|---|
| Archived | Product is archived; does not appear in lists by default. | Press Unarchive if needed. |
| Awaiting approval | Product is not approved. | Check the Fields awaiting approval row in the Definition tab. |
| On sale / Off sale / Undecided | General or channel-based salability value. | Change in the Salability tab. |
| Unsaved | Image uploaded but not yet saved to product. | Press Save in the Images tab. |
| Successful / Bug / Pending | Result of an integration in the Actions tab. | Read the message below for Bug; Pending means the job is queued. |
SUCCESS, ERROR, INQUEUE and similar codes |
Status of a record in Changes and Actions tabs; shown as-is. SUCCESS is green, ERROR red badge; INQUEUE orange in Actions tab. |
Read error message on ERROR row. |
Detail / edit page
Definition, salability, content, image, price, category, and attribute data load when the page opens. Data for Variants, Stock, Related products, Changes, Actions, and Raw data tabs load when those tabs are opened.
Definition
A read-only summary.
- The first card shows the product's first image, name, and option code; below are Product ID, SKU, Option code, Model code, Barcode, Product type, and Brand.
- The second card shows Company, Source integration, Archived and Approved (Yes / No), creation and update timestamps, VAT rate (manual if entered, otherwise from source), Attribute sets, and Fields awaiting approval.
Brand cannot be changed here. SKU and barcode of variants can be corrected in the Variants tab.
Salability
Manage whether the product is available for sale on two levels:
- General status: independent of channels, applies to the entire product.
- Per sales channel: separate value for each sales channel in the setup. The channel name shows its code and ID; a badge shows the current value.
Both places have options On sale, Off sale, and Undecided. Off sale explicitly disables the product on that channel; Undecided leaves the decision to the upper rule.
To change:
- Ensure the correct salability list is selected in the top List field. Changing the list discards unsaved changes. You cannot save without a selected list.
- Change selections in the general status and channel rows.
- Press Save. If no changes were made, Save is disabled; press Cancel to discard changes.
The record is queued: a "Salability queued" notification with operation ID appears, and changes may not appear immediately. Monitor the operation status in the Actions tab.
Setting General status to Undecided does not remove the stored general value; this field is recorded only when set to On sale or Off sale.
If no salability record or defined channel exists for the product, the tab shows "No salability record or defined channel for this product."
Variants
Lists option-dependent variants (SKUs). Each row shows SKU (click to open variant detail), barcode, and variant-separating attributes (e.g., size) as badges. Variants are listed by option code, so if the product has no option code, it shows "Variants are listed by option code; this product has no option code." If the option has no variants, it shows "No variants for this option."
Correcting variant SKU and barcode
- Press the pencil (Edit) button at the end of the row. The SKU and Barcode fields open with current values.
- Correct the values.
- Save with the checkmark (Save); cancel with the cross (Cancel).
SKU and barcode are saved together; empty fields keep their old values; if both are empty, save is disabled. On success, a "Variant codes updated" notification appears. This change is written immediately without approval, does not enter bulk save flow, does not appear in the Actions tab, and cannot be undone. Check values carefully before saving.
Variant builder
The Variant builder button appears only on option-type products and if you have product write permission. It creates new variants in bulk under the option. It has four steps; the box shows "Step N / 4" at the top. You can go back with Back or close with Cancel.
- Select the Variant attribute list (first list selected by default) and choose a variant attribute (e.g., size) from the 1st axis field. You can add up to four axes with Add axis; the same attribute cannot be selected twice; remove extra axes with the trash (Remove). If no variant-type attribute exists in the setup, a warning "No variant-type attribute in setup." appears.
- Mark values for each axis. Use the Search or type a new value box to search, Select visible (N) to select all visible values (Clear visible clears selections), or type a new value and press "… use as new value". At least one value per axis must be selected. Below it shows "N variants will be created."
- Each value combination is a row. Enter SKU and Barcode for each row: both required, unique in the table, and not used elsewhere in PIM. Invalid cells have a red border and notes "Duplicate in table" or "In use in PIM"; during validation, it shows "Codes are being checked…". Suggest empty SKUs fills empty SKUs with "optioncode-value-value" format. Delete unwanted combinations with the trash at the row end. Returning to step 2 and changing values preserves codes for unchanged combinations.
- Check the summary "N variants will be created under …" and the code list, then press Create N variants.
If successful, a "N variants recorded" notification appears, the box closes, and the variant list refreshes. If some variants failed, a "Saved; N products failed" notification appears, the box remains open, and a table with "N products have errors" appears at the top (Product, Status, Error type, Error path, Error message).
Content
The tab consists of three sections.
1. Content fields
Product texts are stored in content lists; each list is a sub-tab. Each language is shown in a separate card with the language name on the badge at the top.
| Field | Editor |
|---|---|
| Product name | Single-line text. |
| Short description | Multi-line text. |
| Long description | Rich text editor (headings, lists, bold, etc.). |
| SEO description | Single-line plain text. |
| Other description | Multi-line text. |
- Edit fields and press Save at the top; a "Content saved." notification appears. If no changes, Save is disabled. Empty fields are deleted from the product.
- Selecting a language from Add language opens empty fields for that language; no record is created until saved. If all languages are added, it shows "All defined languages added."
- If no content list exists in the setup, it shows "No content list defined in setup."
AI description
The AI description button opens a box to generate the long description with AI. There are three modes:
- Generate description: The Inputs to consider section has Use photos (first three images), Use product name, and Use attributes options; all checked by default. If none are checked, a warning "Select at least one. Without input, the model will fabricate the description." appears and you cannot run.
- Improve description: improves the long description of the first language card in the selected content list.
- Translate to other languages: select at least one language from Target languages; translates the same long description into those languages.
If the long description is empty in improve and translate modes, a warning "This mode uses the existing description; long description is empty." appears.
- Select mode and press Run. The button shows "Generating…" while running.
- In generate and improve modes, you can edit the generated text in the box. Press Apply to write it to the first language card's long description and close the box.
- In translate mode, results come in separate cards per language; press Apply per language or Apply all for all. If the target language card is not visible, it opens.
- Applied text is written only to draft ("Written to draft" notification). Press Save in the content section to make it permanent.
If generation fails, a "AI description generation failed" notification appears.
2. Title and additional content
The Title field and dynamic content fields defined in your setup are edited here.
- Select List and Language. The language list shows the language-less base record as
std. Changing list or language discards unsaved changes. - Edit fields. If no manual value exists, the source value is shown initially with a From source badge. If manual differs from source, "Source: …" appears below the field.
- Press Save (N); the number in parentheses shows changed fields. Notification says "Content saved."
This section appears only if a content list exists in the setup. Without product write permission, Save (N) is hidden and text fields are read-only. If no dynamic fields exist, it shows "No dynamic content fields defined in this setup."
3. Table of all text fields
Shows all text fields in the product, including those from source, read-only: Field, Value, List, Language, Source, Publish window.
Images
Upload, order, and delete product images and videos. All changes accumulate in a draft on screen; nothing changes in the product until you press Save. Order determines channel image order; the first image is the cover.
At the top are Asset list (the list of product images at open), Search (by file name or type), Cancel (only if draft changes exist), Save, and Add image. Each card shows the image or playable video, file name, type badge, and order number. Card buttons:
- Drag the card or use Move up / Move down to reorder.
- Enlarge opens the image large and shows original size below ("Original size: W × H pixels").
- Video poster (videos only) uploads the cover image for the video; a "Poster selected; don't forget to save" notification appears.
- Remove removes the image from the draft. The last image cannot be removed ("Last image cannot be deleted").
Adding images
- Press Add image.
- Select Asset type and choose one or more images or MP4 videos from Choose a file.
- Press Add. Files upload immediately and appear on cards with Unsaved badge ("N files uploaded; don't forget to save").
- Press Save. A "Images saved" notification with operation ID appears.
Add image is disabled if Asset list is not selected. Changes may not appear immediately as saving is queued. Cancel reverts all unsaved changes (added, moved, removed images).
Prices
| Column | Meaning |
|---|---|
| List | Price list. |
| List price, Sale price | With currency. If a source price exists in the same list and currency, it is shown below in faded text. |
| Campaign price | Campaign price if any. |
| Validity | Start → end time. |
| Source | Manual or From source; some rows also show Transferred badge. |
| Actions | Edit and (only for manual prices) Remove. Shows "—" if no product write permission. |
Manual prices are listed first. If no manual price exists in the same list and currency, the source price appears as a separate row. If the product has no price, it shows "This product has no price."
Adding or editing prices
Requires product write permission.
- Press Add price or Edit on a row. The box title is Add price or Edit price. If no price list exists in the setup, Add price is disabled.
- Fill fields:
| Field | Required | Explanation / rule |
|---|---|---|
| Sale price | One of the two | At least one of sale or list price must be entered ("One of sale or list price required"). Cannot be negative. |
| List price | One of the two | Cannot be negative. |
| List | Yes | Price list. Cannot be changed when editing a manual price. |
| Currency | Yes | If not selected, the first currency in the list is used. |
| from | No | Price validity start. |
| to | No | Cannot be before from ("End date cannot be before start date"). |
- Press Save; a "Price saved" notification appears.
Editing a source price does not change that row; a new manual price is created in the same list and currency and used thereafter.
Deleting prices
Press Remove on a manual price row. The dialog shows which price in which list will be deleted. Confirm with Remove. Source prices cannot be deleted.
If some products fail in price, attribute, or title/additional content records, a notification "Saved; N products failed" appears and a "N products have errors" table appears at the top; you can close the table with the cross.
Stock
Shows product stock per catalog read-only: SKU, Barcode, Catalog, Stock, Available, Offset, and Stock history. The icon in the Stock history column opens a box listing stock changes (Date, Source, Stock) for that barcode. Rows without barcode show "—" instead of icon; if no history, it shows "No stock history for this barcode."
Categories
Lists all categories the product is linked to. At the top are Category tree, Search (by category name or ID), and Add category. Selecting Category tree does not filter the list; it determines which tree Add category shows. The tree containing the product's category (or the first tree if none) is selected at open.
Each row shows category name, linked list, node type badge, and category ID. The arrow at the row start (Show marketplace mappings) opens the category's marketplace mappings; if none, it shows "No marketplace mapping for this category." If the product has no category, it shows "This product has no category link. You can link with 'Add category'."
Adding categories
- Select the correct Category tree and press Add category.
- Search or expand branches in the opened tree. Click rows of categories to add; selected ones show Selected badge; clicking again deselects. Categories already linked to the product show "Already linked to this product" note and Linked badge and cannot be selected.
- Press Add. Change is queued ("Category change queued") and may not appear immediately.
Removing categories
- For manually added categories, the Remove button removes the category immediately without confirmation. Ensure the category's tree is selected in Category tree before removing.
- For categories from rules or source, the button is named Remove rule/source category and appears only if you have product write permission. The confirmation reminds that the category may return if the rule runs again or source resends. Confirming with Remove shows "Category removed" notification.
Attributes
Switch among three views with the top selector; counts are in parentheses.
- Used (N): attributes with values on the product (manual and source rows without manual counterpart).
- Default (N): attributes suggested by the setup for this product but not yet used. If all are used, it shows "No unused default attributes."
- Sets (N): attribute sets of the product and completeness of attributes in each set.
The Search attribute or value box filters the list in Used (N) and Default (N) views. Columns in Used (N) table:
| Column | Meaning |
|---|---|
| Attribute | Attribute name and code. AI-suggested values have AI badge. |
| Value | Value; if available, equivalent in another language and "Source: …" line. |
| List, Language | Attribute list and language of the value. |
| Source | Manual or From source. |
| Publish window | Validity period of the value. |
| Actions | Edit and Remove. |
In Default (N) view, only Attribute, Value, and Add this attribute button appear.
In Sets (N) view, each set is a card: "X / Y filled" badge and if any required attribute is empty, "N required attributes empty" badge. Filled attributes show green check and value, empty show red cross, required attributes show a star. If you have product write permission, the pencil button on each row edits the value if it belongs to your source; otherwise, or if empty, it allows adding a new value for that attribute. If the product is not linked to any set, it shows "This product is not linked to any attribute set."
Edit and delete rule: you can only change rows written by your own source. Buttons are disabled on rows written by another source (e.g., integration) and show "This row was written by another source; you can only change rows from your own source" on hover. If your user source ID is unreadable, a warning appears at the top of the tab and you can only add new rows.
Adding or editing attributes
Requires product write permission.
- Press Add attribute, Edit on a row, or Add this attribute in Default (N) view. The box title is Add attribute or Edit attribute. If no attribute list exists in the setup, Add attribute is disabled.
- Fill fields:
| Field | Required | Explanation / rule |
|---|---|---|
| Attribute | Yes | Selected from list when opening Add attribute; buttons next to it (Edit attribute, New attribute) allow editing the attribute definition or creating a new attribute. Cannot be changed on existing or default rows. |
| Value | Yes | Select from the attribute's defined values in Pick a value box or type a new value in the search box and press "… use as new value". Values not in the list are defined as new values on save. |
| List | Yes | Attribute list. Cannot be changed when editing an existing row. |
| Language | Yes | Defaults to std (language-less base record). Cannot be changed when editing an existing row. |
| from / to | No | Validity period of the value; end cannot be before start. |
The "…" define value for attribute button visible while typing adds the value to the attribute's value list before saving ("… value defined" notification). Buttons next to the value field (Edit value, New value) open the full definition of the value; see Attributes — detail for details. 3. Press Save; a "Attribute saved" notification appears.
Deleting attributes
Press Remove on a row. The dialog shows which attribute and value will be removed from the product. Confirm with Remove.
Related products
Manage products bought together, recommended, or included in bundles. Each row shows image, product name (click to open detail), SKU and barcode, relation type badge, "Qty: N", price (if nonzero), "Stock: N", and relation creation time. The Search box filters by name, SKU, or barcode. If none, it shows "No related products linked to this product."
Adding related products
- Press Add related product.
- Select Relation type: Bought together, Recommended, Bundle, Before, After, or Comparable. Enter Qty (default 1) and Price (default 0).
- Enter code in Search products and press Search or Enter. Search matches SKU, model, option code, and barcode; not product name. First 25 results are listed.
- Mark products to add. The product itself (The product itself) and already linked products (Linked) cannot be selected.
- Press Add; a "Related product added." notification appears.
Editing and removing
The pencil button opens Qty and Price fields; save with checkmark ("Relation updated"). The trash (Remove) deletes the relation immediately without confirmation ("Relation removed"). Changes in this tab are written immediately without queuing.
Changes
Shows field-level change history of the product: Date, Field, New value, Operation, List, Status, and User. The Status column shows codes like SUCCESS (green), ERROR (red) as-is; error rows show the error message below.
Actions
Lists record operations covering the product. Each row shows status badge (code), time, message, and operation ID. The arrow at the start expands operation details; only one operation can be open at a time:
- Status, source, and if any, error type, error path, and error message per product. If the operation covers multiple products, this product is marked with This product badge; others appear as links.
- Changed fields: operation type, list, field, and new value.
- Integration results: per integration Successful, Bug, or Pending. Long error texts are shortened; Show all expands, Collapse closes.
If the product has an option code, the Integration logs (code) button above the tab opens the Sending logs screen filtered by this option code. If no operations exist, it shows "No recorded operations for this product."
Raw data
Shows the raw record from the source as-is. Raw data comes per variant (SKU), so option and model records are empty; in that case, it shows "Raw data comes from source per variant (SKU); option and model records are empty."
Common situations
- No Archive, Send to marketplace, or Delete product buttons in the header. These require product write permission; Delete product also appears only on option-type products.
- Variants or Raw data tabs are empty. Variants come by option code, raw data by variant (SKU). Open the option record for variants, variant detail for raw data.
- Saved but changes do not appear on screen. Salability, image, category, price, attribute, and title/additional content records are queued. Refresh the page after a while; monitor status in Actions tab.
- Edit and delete buttons on attribute rows are disabled. The row was written by another source; you can only change rows from your own source. Add your own value with Add attribute if needed.
- Cannot remove last image. The product must have at least one image. Add a new image first, then remove the old one and press Save.
- Send button disabled in Send to marketplace box. Marketplace and send type are not selected or product and variants have no barcode.
Related screens
Video tutorials
- Adding and removing categories to a product: Add categories from the Categories tab in product detail, remove manually added categories, recognize default (breadcrumb) categories; step-by-step and video.
- Updating product content and generating description with AI: Update product name, short and long descriptions, and languages from the Content tab; generate description with AI; step-by-step and video.
- Opening and closing product salability: Open or close product sale generally or per sales channel in the Salability tab; relation to stock; step-by-step and video.
- Updating product photo: Add, reorder, remove, and save images from the Images tab; difference between picture and dummy; step-by-step and video.